Category: Recipes

  • Al pastor tacos⁠—Jose style

    Al pastor tacos⁠—Jose style

    My boyfriend had some of the best and worst tacos he’s ever had when we visited Puerto Rico. When we came back to D.C., he was missing the al pastor ones that changed his life, so he decided to learn how to make his own at home. He slow roasted marinated pork shoulder stacked with pineapple, sliced it up, toasted corn tortillas, added cilantro and sliced onions, and managed to make some super delicious tacos. We live streamed the whole thing on his Twitch, so you can find that here, and follow the recipe below to make your own!

    Top tips from me and Jose:
    1) You can get most of these ingredients at any grocery store, but your best bet is to go to a Hispanic market to get quality tortillas, spices, and meat. You can do powdered Guajillo and Pasilla chiles for the marinade, but it’s better to buy dried chiles. If you do get the dried chiles, you’re going to want to boil 5 of each with 2 cups of water for 10 minutes until soft, then remove the stems and seeds, before pureeing them with the chipotle chiles, onions, pineapple juice, vinegar, garlic, and cumin in a food processor. Otherwise, follow the recipe below.
    2) We eyed most of the measurements and it turned out perfect. These are estimations below, so do what you feel is best!

    3) Allow your meat to marinate at least 2 hours, but the longer the better, so make it the night before if you can.
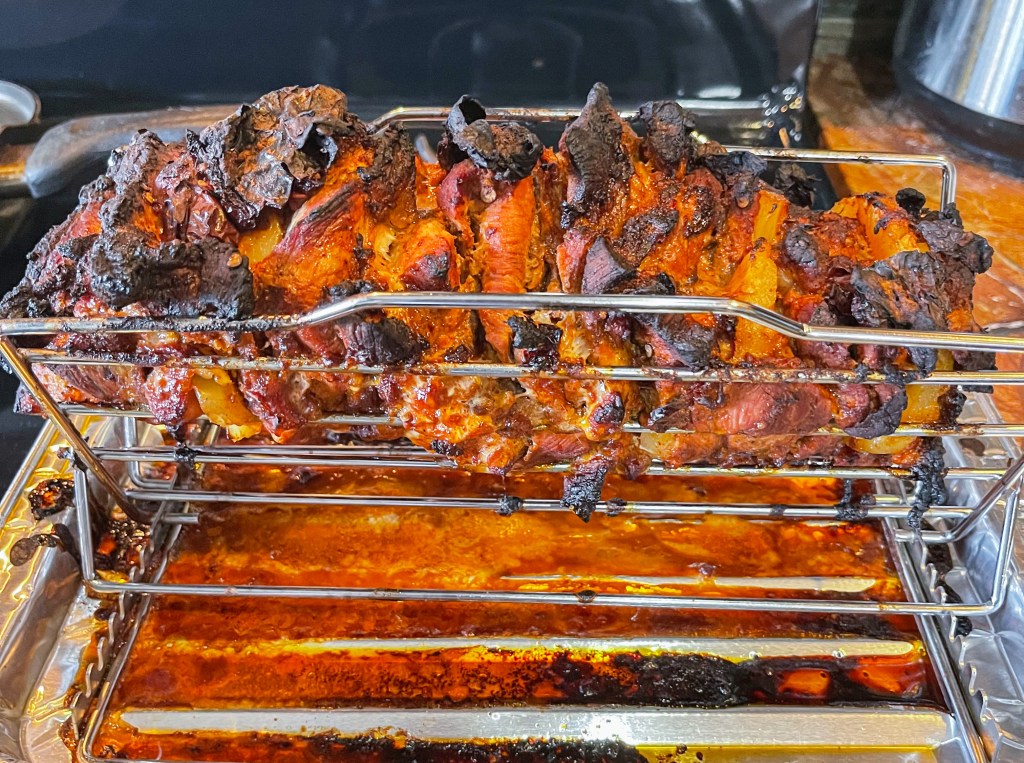
    4) Buy an adjustable roast rack to hold up your stacked meat and pineapple in the oven, and to allow it to evenly cook.

    5) Patience is key. Start this recipe at least 4 hours before you want to eat.
    6) Warm your corn tortillas in a skillet to make sure they don’t fall apart, and because they taste better that way.

    Time:
    From start to finish, this took us about 3.5 hours. This could easily make 18 tacos, if not more.

    Ingredients
    2.5 lbs pork shoulder, sliced into fillets big enough to stack on a skewer — 4 tbsp powdered Guajillo chile — 4 tbsp powdered Pasilla chile — 1 can of Goya chipotle chiles in adobo sauce — 2 tbsp minced garlic — 1 tbsp ground cumin — 1 tbsp salt — 2 tbsp Goya Adobo seasoning with pepper — 1/4 cup white vinegar — 2 cans pineapple rings, most for stacking, leftovers to dice and garnish tacos — 1-2 wooden skewers — adjustable roast rack — metal or aluminum pan — 18 corn tortillas — 1 bunch cilantro — 1/2 white onion, diced

    Instructions:

    1. Slice the meat into fillets about 1 inch thick. Add them to a dish or pan for marinating.

    2. Add Guajillo chile, Pasilla chile, chipotle chiles in adobo sauce, minced garlic, ground cumin, salt, Adobo with pepper, and white vinegar to the pan with meat. Mix until thoroughly coated. Cover with foil and let marinate in fridge for 2-8 hours.

    3. Preheat oven to 400 degrees F.

    4. Remove meat and set up roasting pan. Hold the skewer up on a plate and start stacking the meat. About every third piece, add a pineapple ring. Repeat until all the meat is stacked.
    5. Place the stacked meat sideways on the adjustable rack, which should be on top of a pan. Place in oven and bake for 1 hour and 20 minutes.

    6. Before meat is done, slice onion and chop cilantro for toppings. Toast corn tortillas in a pan over medium-heat for a few seconds on each side.

    7. Allow meat to rest for at least 5 minutes after removing from the oven. Slice however you’d like, but I recommend holding the skewer vertical over a plate and slicing from the top down like shawarma.

    8. Build your tacos! Add meat, pineapple, onion, cilantro, and other optional toppings like hot sauce, on your warmed tortillas. Enjoy!

    Check out the streams here!

  • French onion labneh

    French onion labneh

    The tang from the labneh with the earthy, salty flavor of the onions, and the sweet cut of that pomegranate molasses truly makes one of the best dips I’ve had. This is like that Helluva Good French onion dip but fancy, homemade and so much better.

    Top tips from me:
    1) You can head to any of the Whole Foods to get the ingredients you need, though I couldn’t find the nigella seeds at mine. Otherwise, you can check out one of the several Arab grocers in the DMV, like 
    the Mediterranean Way Gourmet Market or Shemali’s Market. 
    2) Try to grab the Karoum brand labneh, or ones that come in a tub like sour cream, since according to Marcelle, they aren’t as thick as the Turkish style ones that are in what look like cream cheese containers.
    3) If you can’t find chives, one can use scallions, just a little less in proportion.
    4) A note from Chef Marcelle on optional ingredients: “The sumac, pomegranate molasses, nigella seeds, one may not have in their regular pantry, but they are great to have and cross utilize in other recipes if you choose to get them for this recipe. Sumac is a great spice that we use for acidity, that can enhance any salad or be used in any rub. Pomegranate molasses can be substituted for balsamic, and brings an awesome tangy touch in marinades and dressings. Nigella seeds bring a great oniony crunch as a finisher on any dip, and I actually love adding the seed in baked goods too!”
    5) When cooking the garlic and onions, keep a close eye on them and stir frequently! You may need a few extra minutes to really caramelize those onions if your stove is as old as mine. I’d say it took me an extra 5 minutes or so to get them properly browned.
    6) I didn’t try the dip without Marcelle’s suggested toppings, but I do think the pomegranate molasses is definitely a must-add. So good!
    7) When serving, swirl a donut-shaped divot in the dip and then add your extra onions and molasses in there.
    8) Serve with fresh warm pita, pita chips, vegetable crudite, potato chips, or as a smear on your bagel, whatever you want, but as Marcelle says, we enjoy it as a part of every meal!

    Time:
    This took me max 45 minutes start to finish, accounting for the 30 minutes of refrigeration. This could easily serve like 10 people paired with dipping vessels.

    Ingredients
    1lb Labneh — 2 Tbsp Chives, chopped — ½ tsp Onion Powder — ½ tsp Garlic Powder — 1 medium Sweet or Spanish Onion, small diced — 2 cloves Garlic, minced — 1 tsp Sumac (optional) — ¼ tsp Allspice, ground (optional) — Kosher Salt — Olive Oil — Toppings: pomegranate molasses, nigella seeds, cooked onions and garlic, chopped chives or scallions

    Instructions:

    1. In a medium pan, over medium heat, add 1 Tbsp olive oil. Add the diced onions, cook on medium heat for about 3-5 minutes, stirring frequently, until they start to lightly brown, add a pinch of salt.

    2. Lower heat, add minced garlic, add ½ tsp more olive oil.

    3. Add the sumac and allspice, and another pinch of salt. Cook for an additional 5-8 minutes or until they appear lightly brown and caramelized.

    4. Set in a container (no lid) and allow to cool completely.

    5. Place the labneh in a medium bowl, whisk until it starts to loosen, the more you whisk labneh, the silkier it becomes. This will take about 2 minutes.

    6. Fold the chives, onion powder, and garlic powder into the labneh.

    7. Reserve 2 Tbsp of the cooked onion and garlic mixture to use as topping. Place the remainder and fold into the labneh, with all of the residual bits and oil.

    8. Refrigerate for at least 30 minutes before serving. It can be refrigerated for up to 5 days. 

    9. When serving, we like to top it with a swirl of pomegranate molasses, ½ tsp of nigella seeds, the caramelized onions & garlic, and chopped scallions or chives. You can use all or any combination of these items!

    10. Serve with fresh warm pita, pita chips, vegetable crudite, potato chips, or as a smear on your bagel — we enjoy it as a part of every meal!

  • Spam musubi

    Spam musubi

    The sweet and salty spam was so delicious with the soft, sticky rice and the crispy seaweed. I know my wrapping skills aren’t nearly as good as Akina’s, but I can see why this flavor combination is so popular!

    Top tips from me:
    1) Most grocery stores will carry the ingredients you need, but if it’s a smaller store, head to a store like Hana or Rice Market to find quality sushi rice, furikake and sushi nori. While you’re there, maybe see if you can find the mold (or on Amazon).
    2) Akina sent photos of her using low sodium Spam so I followed in her footsteps! Feel free to use the regular kind, though.
    3) The Spam can works with a bit of saran wrap to help pull the rice out, but I imagine you can get a tighter sushi wrap and way more rice in there if you use a proper mold.
    4) I recently ran out of sushi rice and couldn’t get more in time, so I used a bunch of  online advice to make my plain white rice more sticky. I added extra tablespoons of water to steam it longer, letting it sit on the stove on low for another 20 minutes, then added in about a tbsp of rice vinegar.
    5) I definitely did not make enough rice though, which is why my musubi looks way thinner than the gorgeous photos on Abunai’s social media. Make sure you make enough rice. In fact, make too much rice. You can never have enough.
    6) Make sure you pan fry the Spam before adding the sauce! Get it nice and crispy, but not dry.
    7) Give the sauce a good stir before adding it to the pan because the sugar didn’t fully dissolve for me. Also make sure you get that garlic and ginger onto the Spam.
    8) You’ll like find sushi nori sheets that are too long, so just cut them in half. Nice and simple.
    9) Wrap your musubi as tightly as possible, but don’t get discouraged by it not looking perfect. It’ll still taste amazing (I promise).
    10) Don’t forget the furikake on top. I did before I took photos, but added it shortly after, I swear.

    Time:
    This took me about an hour start to finish with my photo and video pausing. When making this for yourself for lunch, depending on your sushi-wrapping skills, it will likely take 30 minutes. This could easily be a meal for four, if each has four musubi.

    Ingredients
    1 can reduced sodium Spam — 4 cups sushi rice or white rice (see tip for how to make sticky) — 1 cup soy sauce — 1 cup granulated sugar — 1 tsp chili paste — 1 tsp oyster sauce — 1 tbsp sesame oil — 1 tbsp mirin, — 1 tbsp minced ginger — 1 tbsp minced garlic — 4 full-sized sushi nori sheets (8 when cut in half) — furikake 

    Instructions:

    1. Take Spam out of can and cut into 8 even slices.

    2. Meanwhile, cook your sushi rice. Once cooled down to room temperature, mold rice into musubi mold or spam can wrapped in saran wrap. Make sure the rice mold is several inches thick. 

    3. Combine soy sauce, sugar, chili paste, oyster sauce, sesame oil, mirin, minced garlic and ginger in a bowl to create Abunai sauce. Set aside to add to Spam slices later.

    4. Pan fry Spam slices in skillet with a little oil, until golden brown on both side.

    5. Once both sides are seared, add a splash of Abunai sauce (about 1 tbsp) on one side then flip to sear with the sauce for a few minutes. Repeat on the other side. 6. Remove spam from the pan and assemble your sushi-making station. Cut sushi nori sheets into the length of the spam slices.

    7. Place spam on sushi nori sheet about 2 inches up from the bottom. Place rice mold on top.

    8. Wrap the nori sheet around spam and rice mold as tightly as you can.

    9. Cut Musubi in half. Sprinkle furikake on top and splash with extra sauce. Enjoy! 

  • Stuffed bronzini

    Stuffed bronzini

    The flavor of the paste combined with the fresh, crunchy toppings and sweet sauce was complex yet very light. The fish was fall-off-the-bone tender and overall, my taste tester says this was the perfect filling summer meal. Plus, it was simple to make! 

    Top tips from me:
    1) First and foremost, the most important thing is getting the freshest fish possible. I was lucky and was gifted this beautiful bronzini, already scaled and gutted, from the Lucky Danger team themselves. I would recommend checking out your local fish market, like the Wharf’s Municipal Fish Market. The team’s work to clean the fish did save me a lot of time (and another bloopers reel), so maybe splurge for the cleaning service offered at the Wharf.
    2) If you need to clean the fish yourself and have not done so before, make sure you find a video or guide easy for you to follow and stick to it. This one gave me a clue on what that process looks like.
    3) You can buy fried shallots pre-made but I had a shallot in so I decided to make them myself. I followed this Epicurious recipe and they came out deliciously crispy. 
    4) If your food processor is a bit off-peak like mine, add a drizzle more oil until it does form more of a paste than just a rough pesto.
    5) Make sure to add enough oil to the pan and cooking spray on the fish to avoid the skin sticking and getting ripped off. I added quite  bit and it still ripped off when flipping and such, so just be extra extra careful.
    6) Some of the filling will fall out when cooking the fish but don’t worry about that.
    7) Make sure you vaguely measure your largest frying pan before transferring the fish to it. I made the mistake of not doing that, which led to my fish forming a crescent shape as I tried to force it to fit the pan.
    8) Be careful when you pour the remaining oil onto the fish before serving. It will likely splatter a bit and will still be hot!

    Time:
    Overall, this took me about an hour and a half start to finish, keeping in mind that I did stop to take photos. If you’re cooking this like a normal person and the fish is already cleaned, then this would definitely take you under an hour, if not 30 minutes with pre-made shallots, too. This could easily be a meal for one or two or three. Depends on how hungry you all are!

    Ingredients
    1 bronzini, scaled, gutted and rinsed — 1 stalk lemongrass, crushed and chopped — 1 bunch cilantro — 4 cloves garlic — 1 tbsp ginger rough chopped — 4 tbsp grapeseed or canola oil, half for filling and half for frying — 2 tbsp fried shallots — 2 stalks scallions, julienne — 4 mint leaves, chiffonade cut — 1 tsp + 1 tbsp rice vinegar — 1 tsp sesame oil — 2 tbsp oyster sauce —  1/4 cup soy sauce — 1/4 cup water — 1 tbsp sugar

    Instructions:

    1. Make sure the fish’s belly is open after gutting. Make 3 diagonal cuts into the fish on each side of the fish.

    Season lightly with salt and pepper on inside and outside of fish. Set aside for now.

    2. Place lemongrass, 1/2 of the bunch of cilantro, garlic, ginger and 2 tbsp of the oil in a food processor and pulse until it forms a paste.

    3. Gently open up the the belly of the fish and stuff the paste in, filling it up. Set the stuffed fish aside.

    4. Fry your shallots, if needed. Slice one shallot thin. Use a small sauce pan and heat 1 cup of canola oil over high heat until 275 degrees. Fry the shallots for about 8 minutes until golden. Remove the shallots with a slotted spoon and place them on a plate covered in a paper towel. Increase the heat until oil is 350 degrees. Set up a heat proof bowl with a sieve over the top. Add the shallots back in and fry for a few seconds until crispy and browned. Pour the oil and shallots over the sieve into the bowl. 

    5. Mix the shallots, scallions, mint leaves, 1 tsp of rice vinegar and sesame owl in a bowl, and season lightly with salt and pepper. Continue to toss until leaves wilt slightly. Set aside for toppings.

    6. Add 1 tbsp rice vinegar, oyster sauce, soy sauce, water and sugar to a small saucepan. Heat sauce until sugar dissolves and set aside.

    7. Lightly spray fish on both sides with nonstick cooking spray.

    8. Heat large non-stick pan on high heat. Pour 2 tbsp cooking oil into pan, and place fish carefully into pan.

    9. Lower heat to medium and cook for 4 minutes. Carefully flip fish onto other side and cook for an additional 4 minutes.

    10. Remove fish and place on serving plate. Pour sauce over fish and top with toppings.

    11. Reheat oil that is left over in nonstick pan till about smoking. Pour oil over toppings.

    12. Serve and enjoy!

  • New Orleans-style BBQ shrimp

    New Orleans-style BBQ shrimp

    The buttery sauce with that tang from the Worcestershire and freshness from the rosemary pair perfectly with the tender shrimp. Then that salty bread adds the perfect crunch and rounds out an ideal BBQ meal.

    Top tips from me:
    1) First and foremost, the most important thing is getting the freshest shrimp possible. David stresses that getting shrimp where the head may be slightly detached, or they may stink a bit, or they may be slimy can entirely ruin the dish. Even if the seller has the shrimp on ice, you should check that the shrimp is fresh before purchasing. I got mine from Captain White’s Seafood City at the Wharf’s Municipal Fish Market since they had a head-on option that looked/smelled/felt fresh to me. Check those stalls out for similar options!
    2) Definitely mentally prepare yourself if you’ve never cleaned shrimp before. Here is the step-by-step guide I used that helped me figure out what I needed to do, since it was my first time. 
    3) Use surgical or latex gloves for when you’re cleaning the shrimp! You’re welcome to go at it bare-handed, but I felt more confident getting all the shell off and getting the vein out with the gloves keeping my hands clean.
    4) When peeling, be careful not to pull too much near the head or squeeze it, since we want to keep it on. Use a paring knife to slice only about a centimeter into the shrimp’s “back” and get that vein out. Pull gently so the whole thing comes out, and feel free to use that paring knife to help with the peeling. I cut the antennae off and peeled the legs as well to make the shrimp a bit cleaner to cook and eat.
    5) I, for some reason, was not expecting the shrimp to slide around once placed on the skewers but they do, so just be weary of that when it comes to transferring them to a pan or the grill.
    6) Use fresh minced garlic in the sauce for the strongest flavor.
    7) Close the grill lid immediately after setting the shrimp and bread on the grill to keep the heat at a fairly consistent temperature. Set a timer when cooking the shrimp to make sure you don’t over cook them. Just toast the bread to however crispy you would like it.
    8) This sauce honestly goes on anything! It’s delicious, and I’d definitely drench your shrimp in it.

    Time:
    Overall, this took me about an hour and a half start to finish, keeping in mind that I did stop to take photos. Prepping the shrimp does take about 20-30 minutes, and the sauce may take a minute to make, but the shrimp cooks quickly. I halved this recipe and it served about 4 but David says his measurements serve 6. It likely depends on what size shrimp you get.

    Ingredients
    6 (12-inch) wooden skewers — 2 lb. unpeeled, raw Gulf shrimp — ¼ cup olive oil, divided — 10 tbsp. butter, divided — 1 tsp. whole black peppercorns — 2 bay leaves — 3 tbsp. minced garlic cloves — 2 tbsp. chopped fresh rosemary — ½ cup Worcestershire sauce — ½ tsp. freshly ground black pepper — 1 French bread baguette, sliced — 4 tbsp. extra virgin olive oil — table salt

    Instructions:

    1. Soak skewers in warm water 20 to 30 min. Peel shrimp, keeping heads and tails on. Reserve the shells in a bowl, throw out the veins and any antennae.

    2. Heat 2 tbsp. olive oil and 2 tbsp. butter in a pan over medium-high heat. Add

    the shells, peppercorns and bay leaves. Cook 3 min. or until shells change color. Add 2 cups water, increase heat and simmer 10 to 12 min.

    3. Remove the stock from heat and pour through a fine wire-mesh strainer into a bowl. Discard solids, and reserve stock.

    4. Light charcoal grill or preheat gas grill to 350-400 degrees (medium-high). Meanwhile, thread shrimp on skewers — about three per skewer.

    5. Heat remaining 2 tbsp. olive oil in pan over medium-high heat for 1

    min. Add garlic and cook for 1 minute. Reduce heat to medium, then add rosemary and cook for 2 min. Add Worcestershire sauce, ground pepper and 1 cup reserved shrimp stock. Increase heat and simmer until reduced by half.

    6. Brush some of sauce over the shrimp, reserving remaining sauce.

    7. Place skewers on cooking grate and grill about 2 min. on each side.

    8. Slice bread about 1 inch thick and brush with extra virgin olive oil, then season with salt. Grill until toasted.

    9. Reheat remaining sauce over medium-high heat and whisk in remaining 8 tbsp. butter, 2 tbsp. at a time.

    10. Place 1 skewer of shrimp on each serving plate, top with sauce and serve with bread. Enjoy!

  • Veggie lumpia

    Veggie lumpia

    Here’s a savory veggie option, finally! These rolls are simple yet so delicious, and feel slightly healthier since they’re packed with cabbage, green beans, carrots and onion. My family raved about them.

    Top tips from me:
    1) If you don’t already know how to julienne cut carrots, French style slice beans. or shred green cabbage, I recommend finding an article or YouTube video to look at as you go so that your veggies are thin and evenly mixed in the filling.
    2) Don’t overcook your veggies! Only soften them. And cooling the filling is important, since a hot filling would break up the pastry.
    3) Same tip with the roll pastries: thaw them overnight in the fridge and don’t let them dry out in the sun or on the counter. Maria also says to make sure they’re covered by plastic to avoid the pastries drying out.
    4) This time, however, Maria recommends using the whole pastry since the veggies are a harder filling and it more completely covers them. This did make for a bit of an easier rolling experience. 
    5) These did absorb a bit more oil. The frying experience is similar to the pork, though they did brown more nicely due to there being no pork fat. You can use a paper towel to drain that excess oil, however, Maria suggests a rack instead since the rolls can reabsorb oil from the paper towels. 
    6) Not a tip, but just saying that these went really well with Maria’s garlic chili vinegar, and did reheat nicely in the oven later that night.

    Time:
    Since it took me a bit to properly cut my vegetables, but then I was much better at rolling after trying the pork lumpia, this recipe also took me about an hour. It only made about 10 rolls.

    Ingredients:
    2 tbsp vegetable oil — 1 cup julienne cut carrots, about 3 carrots — 1 cup shredded green cabbage — 1 cup sliced string green beans, French style — 1/4 cup chopped white onions — 1/2 tbsp minced garlic — salt and pepper to taste — ‘TYJ’ Brand Spring Roll Pastry — 2 cups vegetable oil for frying — 1 egg for sealing — Dine with Claudine’s garlic chili vinegar or Mae Ploy Sweet Garlic Chili Sauce for dipping

    Instructions:

    – Sauté all your julienned vegetables separately in a medium-high heat pan for about 5 minutes until slightly softened.

    – Sauté your chopped onion and garlic until translucent, about 3 minutes.

    – Mix all vegetables together and season with salt and pepper.

    – Cool down your vegetable mixture before starting to roll for about 20-30 minutes.

    – Place your wrapper on a surface with the tip pointing up, creating a diamond shap. Using 2 tablespoons of filling, put your vegetables on the bottom side of the wrapper and shape into a log, about 2 inches away from the bottom tip.

    – Fold the bottom side over the filling and then the left side, and overlap the right. Start rolling away from you until you create an envelope. Dab egg wash on the tip and seal the roll.

    – Heat up the oil until it’s 350 F using a heavy bottom pan. 

    – Fry the lumpia for 4-5 minutes on each side until golden brown all the way through.

    – Set lumpia on a wire rack over a pan to drain excess oil. 

    – Dip in sauce of choice and enjoy!

    Did you make this recipe and love it? Have any suggestions? Leave a comment!

  • OG pork lumpia

    OG pork lumpia

    These crispy, herby, umami rolls are paired perfectly with a vinegar or sweet sauce. They make the perfect snack, lunch or dinner with perfectly cooked tender pork and crispy shells.

    Top tips from me:
    1) Make sure to thaw your roll pastries in the fridge overnight! And do not leave them sitting in the sun or out on the counter too long after thawing or they will dry out. I made that mistake with one packet. I also only used about 10-12 sheets since I cut them in half.
    2) Also, you don’t necessarily need to slice your pastry in half, but Maria said she prefers to do that for her lumpia, so I tried it too! Definitely made for a more bite size and crunchier lumpia.
    3) Finely dice all your produce!
    4) Be ready to get your hands dirty. The best way to make these rolls is to shape the filling yourself and then roll them up, including adding the egg wash.
    5) The rolling is a bit tricky and your lumpia likely won’t look uniform or fully sealed until your fifth try. Don’t beat yourself up about it! Just be patient and try your best to tightly tuck in the sides before adding the egg wash and rolling the lumpia closed.
    6) If you have a thermometer, make sure to check the temperature of your oil. If not, let it heat up for at least 5-7 minutes.
    7) If your rolls aren’t super tight, some of the fat from the pork may come out and leave brown bits on the rolls. It happened to me, and while it doesn’t look super pretty, I promise they still crunch up and taste glorious.
    8) I sliced my first test roll in half to make sure the pork was cooked through before cooking the rest so I’d recommend trying that.

    Time:
    It can be hard for me to estimate this sometimes since I stop to take photos and videos all day, but I’d say these can take about an hour with all the rolling, frying, then cooling. This made about 20 rolls for me.

    Ingredients:
    1 lb ground pork — 1/4 cup chopped parsley — 1/2 medium onion, finely diced —1/4 cup finely diced carrots — 1/4 cup chopped scallions — 1 tbsp garlic powder — 1 tsp ground ginger — 1/2 tbsp salt — 1 tbsp soy sauce — 1 tsp sesame oil — 1 tsp black pepper — 2 eggs (1 for filling, 1 for sealing) — 1 pack of 25 pieces ‘TYJ Spring Roll Pastry’ — 1/2 gallon of vegetable oil for frying — Dine with Claudine’s garlic chili vinegar or Mae Ploy Sweet Garlic Chili Sauce for dipping

    Instructions: 

    – Chop up the parsley and scallions and add them to a large mixing bowl. Then, dice the onion and carrots and add those to the bowl.

    – Add the pork, garlic powder, ground ginger, salt, pepper, soy sauce, sesame oil and one egg to the bowl.

    – Using a spatula, mix the filling until well combined.

    – Slice your spring roll pastries in half diagonally to create two triangles. Whisk second egg in a small bowl to create an egg wash. Lay the halved pastries out next to the bowl of filling and egg wash.

    – Take about 2-3 tbsp of filling and place towards the bottom of the triangle pastry. Shape it into a log about 3-4 inches long.

    – Start to roll the pastry over the filling until it is covered, then fold the two ends in to create an envelope. 

    – Dip your pointer finger in the egg wash and dab it along the ‘flap’ of the envelope.

    – Roll the rest of the lumpia closed and make sure the triangle ‘flap’ is sealed. 

    – Once finished rolling, you can freeze the rolls for cooking later or for an hour or so to make extra crispy lumpia.

    – Heat up your oil in a pan with a thick bottom until it is 350 F. Fry the lumpia for about 8-10 minutes, flipping halfway through and ensuring each side is golden brown. 

    – Make sure you immediately transfer the lumpia to a cooling rack on top of a sheet pan to let excess oil drip off.

    – Dip in sauce of choice and enjoy!

    Did you make this recipe and love it? Have any suggestions? Leave a comment!

  • Carrot cake

    Carrot cake

    My first attempt at staging photos like Half-Baked Harvest.

    This rich, moist, decadent, warm and spicy cake was everything I needed it to be. I dove into a piece as soon as I possibly could and shared the wealth with friends. If you’re looking to celebrate or impress any time soon, make this beauty for sure.

    Top tips from me:
    1) First things first, I couldn’t find any freshly grated nutmeg, so I subbed in ground mace, which is actually made from nutmeg anyways and has a similar flavor. 
    2) My grater only has a very small size and a very large size so I did a combination to make sure my carrots weren’t too small.
    3) I’d stick to the shorter side of baking time to avoid drying out the cakes. 35 minutes was the perfect amount of time for me.
    4) The recipe did call for the domed sides to be down, however, that proved to not work for me when it came to frosting and my cake then split later from the uneven bottom. I would recommend trimming the dome off of one of the layers and putting that on the bottom, then when adding the next layer on top, make sure to put the domed side on top. Otherwise, your cake may dome a lot like mine and later split or have large gaps on the bottom. I discreetly covered up that gap with some piping but it was a bit empty there.
    5) I am usually terrible at frosting and piping, though I’m working on getting better at that. I have this 
    OXO icing knife set, though, that made it so much easier to apply an even layer with less flaws. I would recommend using some similar knife or spatula for ease.
    6) Feel free to add some swirls like Mark suggested, pipe some swirls or sprinkle walnuts on top like I did. Go wild!

    Time:
    Excluding the eight or so hours I froze the cakes, this took about two and a half hours. The golden raisins and walnuts need some care before making the cake batter, and then decorating the cake does take some time. It’s your typical layer cake that will serve at least 8 slices.

    Ingredients:
    Nonstick spray — parchment paper — 1/2 cup golden raisins — 1 cup water — 1 cup chopped walnuts — 1 lb carrots, peeled and coarsely grated — 1 cup buttermilk, room temperature — 2 1/2 cups all-purpose flour — 2 tsp ground cinnamon — 2 tsp ground ginger — 1/2 teaspoon freshly grated nutmeg — 2 tsp baking powder — 1 1/2 teaspoons kosher salt, plus a pinch for the frosting — 3/4 teaspoon baking soda — 4 large eggs — 1 cup granulated sugar —3/4 cup dark brown sugar —3 tsp vanilla extract, 2 for cake and 1 for frosting — 3/4 cup vegetable oil — 12 oz cream cheese, room temperature — 3/4 cup unsalted butter, room temperature — 4 cups powdered sugar

    Instructions: 

    – Preheat oven to 350 degrees. Lightly coat two 9″-diameter cake pans with nonstick spray. Line bottoms with parchment paper rounds; lightly coat rounds with nonstick spray.

    – If using raisins, heat in a small saucepan with water over low just until warm, about 2 minutes. Remove from heat and let sit until liquid is absorbed and raisins are plump, about 15–20 minutes.

    – Meanwhile, toast walnuts on a rimmed baking sheet, tossing once, until golden brown, 8–10 minutes. Then let cool.

    – Peel and grate carrots then combine with buttermilk in a medium-sized bowl.

    – Whisk flour, cinnamon, ginger, nutmeg, baking powder, salt and baking soda in a large bowl and set aside.

    – Using an electric mixer on high speed, beat eggs, granulated sugar, brown sugar and vanilla extract until pale and thick, about 4 minutes. Reduce speed to medium-low and gradually stream in oil.

    – Add dry ingredients in 3 additions, alternating with carrot mixture in 2 additions, beginning and ending with dry ingredients; mix until smooth. Fold in raisins, if using, and walnuts with a rubber spatula.

    – Scrape batter into prepared pans. Bake cakes, rotating pans halfway through, until a tester inserted into the center comes out clean, about 35–45 minutes.

    – Transfer pans to a wire rack and let cakes cool 10 minutes. Freeze all layers overnight.

    – The next day, prepare your frosting before removing the cakes. Using an electric mixer on high speed, beat cream cheese and butter in a medium bowl until smooth, about 1 minute. Beat in vanilla extract and salt.

    – Reduce speed to low and gradually mix in powdered sugar. Increase speed to high and beat frosting until light and fluffy, about 2 minutes.

    – On a cake platter or stand of choice, place one layer domed side down. Spread 3/4 cup frosting evenly over top.

    – Place remaining cake layer, domed side down, on top. Spread top and sides with 1 1/4 cups frosting and chill 30 minutes to let frosting set.

    – Spread remaining frosting over top and sides, swirling decoratively. Add any sort of decorations you want. Allow the cake to thaw for about 30 more minutes before slicing and serving.

    Did you make this recipe and love it? Have any suggestions? Leave a comment!

  • Baca di Dama cookies

    Baca di Dama cookies

    So crunchy and delicious: you can’t only eat one.

    Oh my god. When Miranda warned that these cookies are addictive, she was not kidding. The nutty, buttery, crunchy cookies paired with the smooth and bitter chocolate is the ultimate version of the iconic hazelnut and chocolate combo.

    Top tips from me:
    1) It is a bit hard to find pre-made hazelnut flour or meal, so I had to go the old-fashioned route and make my own. This did add about a half hour of extra effort, but I’m convinced this almost made them better because there were some larger crunchy chunks of hazelnut in the cookie. I’ll add instructions for how to make your own below!
    2) Make sure to fully soften your butter before trying to cream it with the sugar!
    3) This recipe got a bit messy with me with the homemade hazelnut meal and dipping the cookies in chocolate, but you just got to commit to it.
    4) Miranda said she cuts her dough into sizes that are about 18 grams each, but I eyeballed it. This resulted in different sizes, so maybe stick to weighing the dough.
    5) The cookies will seem not done and super soft when you take them out, but as long as they are slightly browned and firm on the top, you will be okay. They firm up all the way while cooling, I promise. They are hard to overbake, however, which is a good thing.
    6) The bakery actually makes a dark chocolate ganache to sandwich the cookies together, but I went the simple route and just melted up a 70% dark chocolate bar to dip my cookies in, which I include below. Up to you if you want to try ganache!

    Time:
    This took me only about an hour from start to sitting down to eat to finish, and if you’re not stopping to take photos like me, you might even get it down to 30 minutes. My measurements made about 4 servings.

    Ingredients:
    10-12 oz hazelnuts (however much will equal 250 grams hazelnut flour once ground) — 250 grams sugar — 250 grams flour — 250 grams unsweetened softened butter — 90 grams dark chocolate, melted

    Instructions:

    – Pour hazelnuts onto a baking sheet and roast at 300F for about 10 minutes until the skin has browned and is splitting. Let cool for about 10 minutes.

    – Put cooled hazelnuts in a tea towel. Bundle it up then gently toss and rub the nuts for a few minutes until most of the skin is removed. It’s okay (and unavoidable) to leave some skin on.

    – Pick the nuts out of the towel and place into a food processor. Pulse at a chop setting until the nuts resemble a finely ground meal or flour. Some larger chunks remaining is okay, just make sure to not blend for too long or the oils will come out and start to make a nut butter.

    – In a large mixing bowl, cream together butter and sugar, then add in half each of the hazelnut and regular flours and mix. Add the rest and mix until it forms a dough. 

    – Take your ball of dough and put it in some plastic wrap, then let it rest in the refrigerator for a half hour or so.

    – Roll out the dough into about five ropes and cut off cookie size portions, around 18 grams or 3 inches a piece. Roll each piece into a ball and space out on a parchment lined baking tray.  

    – Bake cookies at 300F for about 15-20 minutes. Flip your cookies halfway through.

    – Cool cookies for about 20 minutes. Meanwhile, melt your chocolate in the microwave in 30 second intervals until smooth.

    – When the cookies are cool and the chocolate slightly cool, dip a cookie in the chocolate until the bottom is completely coated, and sandwich together with another.

    – Let the chocolate set for about another 30 minutes. Enjoy!

    Did you make this recipe and love it? Have any suggestions? Leave a comment!

  • Madam VP Heritage bowl

    Madam VP Heritage bowl

    Every flavor you need in one bowl!

    This bowl has it all! Crunchy, soft, salty, sweet, spicy, hot and fresh. It’s only a copycat recipe, but this delicious combination of Jamaican and Indian flavors is really the jackpot — and it will definitely be going into regular meal prep rotation.

    op tips from me:
    1) Feel free to use any type of white rice, but I happened to only have sushi rice on hand, which soaked up the flavor nicely.
    2) I will say that I normally cook by eye, so this recipe is full of estimations. Feel free to adjust the spices to your liking. I recommend either adding more spicy peppers or spice to the curry.
    3) I used my trusty Penzey’s sweet curry powder but feel free to use whichever you prefer.
    3) I browned the chicken with just oil, salt and pepper then added in my trusted curry powder. To make sure there was flavor in the chickpeas and potatoes, I simmered those in with the completed sauce and chicken, but you’re welcome to cook your’s in a different order or way.
    4) I definitely didn’t properly fry the plantains, so I’d suggest playing around with vegetable oil or other recipes to make yours’ softer.
    5) Immigrant Food’s ingredient list didn’t include any fresh herbs, but I LOVE a good cilantro on top of my curries, especially ones with coconut milk. I would definitely recommend through those and even some green onions on top.
    6) I didn’t do this and retroactively, I wish I had, but adding a bit of fresh lime juice on top would be the perfect acidic addition.

    Time:
    This took me only about an hour from start to sitting down to eat to finish, and if you’re not stopping to take photos like me, you might even get it down to 30 minutes. My measurements made about 4 servings.

    Ingredients:
    1 cup white rice — 0.25 cup chicken broth — 1 tsp ground turmeric — 2 tsp salt — 2 tsp ground pepper — 3 tbsp olive oil — 1 chicken breast, cubed — 3 tbsp curry powder — 1 can coconut milk — 1 tbsp lime juice — 1 can chickpeas — 1/2 potato, cubed — 1 tsp garlic powder — 1 tsp onion powder — 0.5 tsp cayenne powder — 0.5 tsp cumin — 0.5 tsp chili powder — 1 plantain, sliced diagonally into 0.5 inch pieces — 4 tbsp unsalted butter — 1 pineapple chunk, cubed — 0.25 jalapeño, sliced — cilantro for garnish

    Instructions: 

    – Cook rice according to package instructions. Once it’s cooked, add the chicken broth, salt and pepper and stir.

    – Heat a medium-size skillet on medium-high heat with 2 tbsp of olive oil until it shimmers. Add the cubed chicken breast and season with 1 tsp each of salt and pepper. Cook until chicken is browned.

    – Add 2 tbsp of the curry powder, then add the coconut milk and lime juice. Stir to combine and let simmer for a minute.

    – Add the chickpeas, cubed potatoes, garlic, onion, cayenne, cumin, chili and remaining curry powder. Stir to combine and allow to simmer for at least 6 minutes until the potatoes are soft and the chicken is cooked through.

    – Slice the plantain. Melt the butter in a large skillet along with the remaining tbsp of olive oil. Once it’s shimmering, place the plantain slices around the pan. Fry on each side for 4 minutes then remove and pat down with paper towels.

    – Slice the pineapple, jalapeños and cilantro. 

    – Scoop rice into a bowl. Add curry, then spinach, pineapple, plantains, jalapeños and cilantro.

    – Serve and enjoy!