Absolutely obsessed with these photos. And the fact that I have leftovers in my fridge.
The browned crust paired with the melted, creamy cheese was beautifully salty — with the citrus in the cabbage cutting through. Hands down one of my favorite meals.
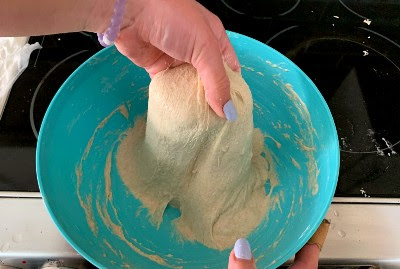
Top tips from me: 1) You are warned: these measurements are guessed based on our cooking session and Maria’s suggestions, but she does not measure when cooking, especially since she knows the recipe so well, so just be weary of consistencies and the photos of what certain steps should look like. 2) The most important thing, according to Maria, is the consistency of the dough. You need to add 1:1 of the flour and water at first, then gradually add either more flour or more water to achieve a consistency similar to Play-Doh. Don’t let it be too runny or you won’t be able to work with it to form your disks or add the filling in properly. 3) One 2 lb. bag of mozzarella cheese + one packet of the crema achieves the perfect texture for your filling. Feel free to add more crema if needed for consistency. You can probably find the cream at your local Latin market. 4) You may need to rinse your hands off after making each pupusa to avoid getting cheese mixture on the dough. 5) Use a griddle pan or cast iron skillet to cook the pupusas. Heat the pan for a few minutes before putting your raw dough on there, then make sure they brown just enough to be a little crusty.
Time: It will likely take only about 40 minutes to make the pupusas with prep time. These rough estimates make about 15 pupusas.
Ingredients: 3 cups of Maseca instant corn masa flour — 3 cups of water — 2 lb. bag of mozzarella — 1 16 oz. package Rio Grande crema la bendicion — 1/2 green cabbage, shredded — 1 Roma tomato — 1 bunch of cilantro — 2 limes, juiced — salt to taste
Instructions: – Place your pan on the stove and warm it on medium heat. – Combine the corn flour and water in a large-sized bowl and mix with hands. Add water or flour if needed until consistency is correct. – Combine cheese and crema in separate medium-sized bowl. – Grab a handful of dough that is about the size of your palm, and roll it into a ball. Press your fingers into the middle of the ball and scoop out to the edge. Continue to do so around the ball until it resembles a small disk with enough space to place filling. – Place about a tablespoon of the cheese mixture in the center of the dough. Fold up the sides to create a dumpling, then roll it into a ball. – Flatten the ball with your palms until it is about 1/4 inch thick. Make sure to smooth over any cracks, ensuring the pupusa is a circle. – Cook the pupusas on the pan in batches. Brown each side, creating a bit of a crust. – While some pupusas are cooking, shred a half head of cabbage with a knife or whatever method preferred. Cut, chop or dice tomatoes to liking, then add both to a medium-sized bowl. – Chop cilantro and add to bowl. – Squeeze juice of 2 limes over salad and mix. – Serve pupusas with salad and enjoy!
Did you make this recipe and have any suggestions? Make sure to leave a comment!
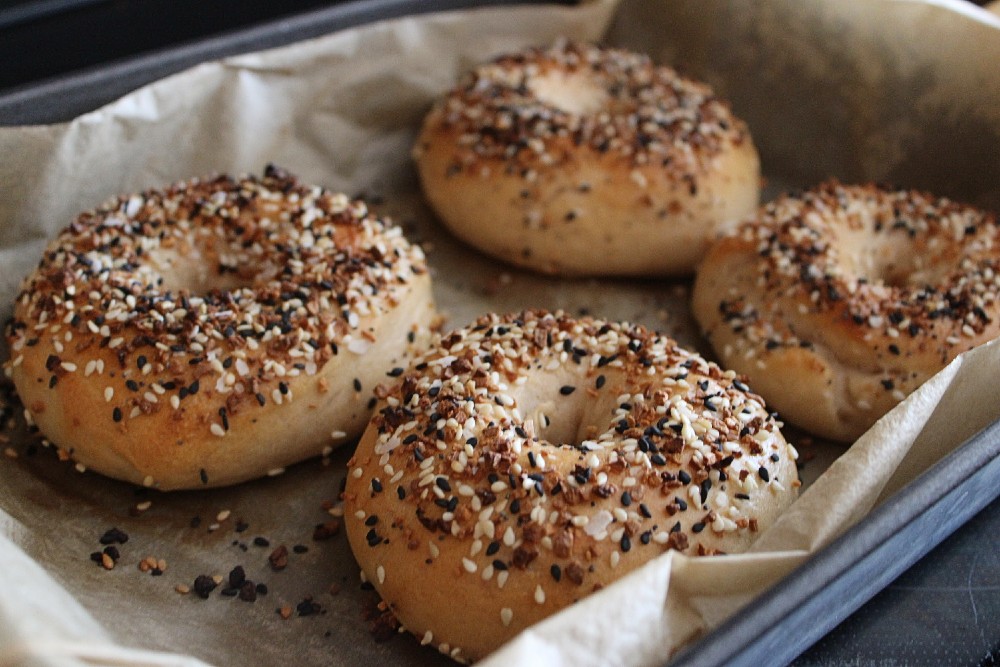
The best combination ever: everything seasoning and creamy cream cheese.
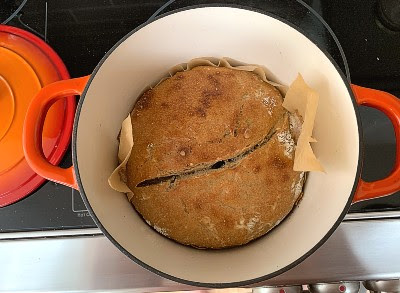
Anela has created the perfect bagel recipe here. I swear this tastes exactly like a bagel you’d get from a deli in New York. She used her sourdough expertise to develop the beautiful crust and chewy inside.
This bagel tastes like the real deal, and I say that as a New Yorker. The crust was perfect, with the inside chewy, soft and moist enough. It was the perfect texture, paired with smooth cream cheese and salty everything seasoning.
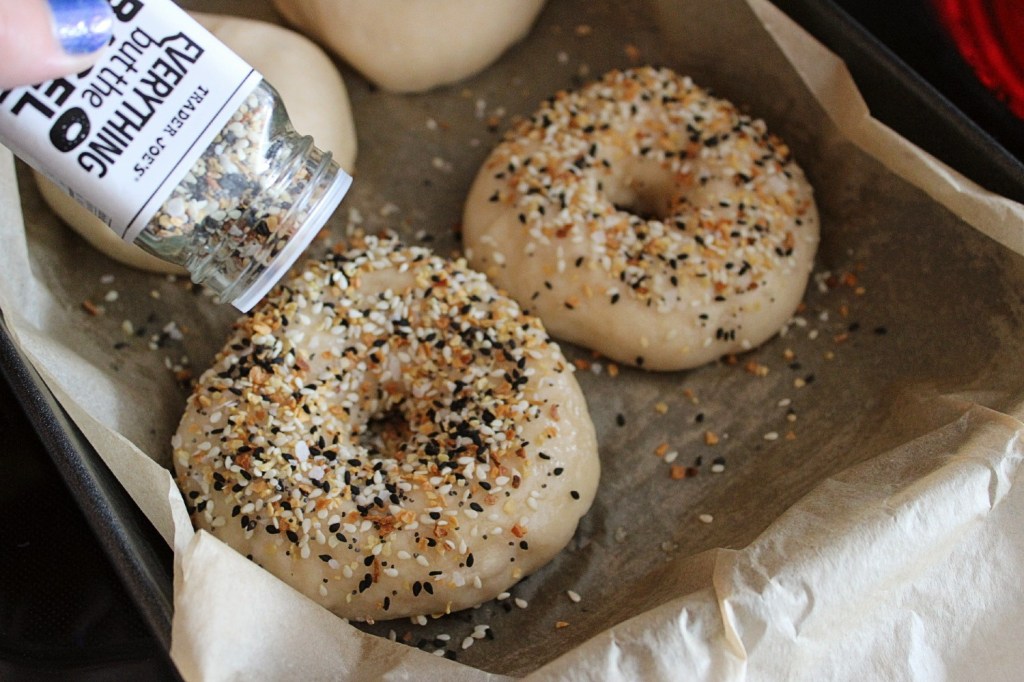
Top tips from me: 1) Your starter needs to be strong! Feed it about 3 hours before you want to mix the dough to make sure its doubled in its size. Try the float test in some water to confirm it’s ready to use. 2) The kneading is the most important part of this recipe. Set a timer for at least 8 minutes, throw on some music and get to a slow and steady pace of kneading. 3) Second most important part: the window pane test. Anela demonstrates this on her site, but basically, after kneading, you rip off a small piece and stretch it from the edges. Hold the piece up to the light, and if it stretches without tearing, and you can see light through it, then the dough is set to use with developed gluten. 4) The dough needs to sit for many hours, between 8 and 10, but Anela says you just need to make sure it has doubled in size. 5) If you want to incorporate an ingredient into the dough like I did, after the rise is the time to do so. Here is when I mixed my dehydrated and roughly chopped berries into the dough by hand, but you could try cinnamon or chocolate chips. 6) After letting the bagels set under a damp towel after shaping, it is essential to make sure they are ready to bake. The best way to do that is a float test with cold water. If the bagel floats, it’s ready to bake; if not, it must rest for 25 minute intervals until it floats. 7) Anela says it’s essential that your water is at a roiling boil when boiling the bagels. Do 30 seconds on each side and use a slotted spoon to flip them. 8) Put the everything seasoning on immediately after removing the bagel from the water. I bought Trader Joe’s infamous everything but the bagel seasoning, though you can make your’s homemade. 9) Make sure to move the try to evenly brown the bagels by flipping the tray halfway through baking.
Time: It will take about 12 hours total to make the bagels. The dough rests for 8 to 10 hours, then another 15 minutes and 30 minutes to an hour. This makes 8 bagels.
Ingredients: 150 grams sourdough starter at 100% hydration — 235 grams water — 20 grams honey — 500 grams bread flour or high protein flour — 9 grams sea salt — about 1/4 cup everything seasoning
Anela Malik talks all things sourdough and supporting local businesses for my July edition.
The salty everything seasoning explodes on your tongue as you bite into the crust.
Welcome back to The Sunday Roast! It’s been almost six months since I started quasi-quarantining and working from home. The state of the world still has me so concerned, and I hope everyone is staying as safe as possible.
This month: I went back to the source of my inspiration to reach out to last month’s subject, Roaming Rooster, and asked Anela Malik (or FeedtheMalik, as you may know her) to speak with me! We talked about supporting Black-owned businesses in the DMV area, all about the master list of those businesses that she created and continually updates and our mutual love of sourdough. I’ve used Anela’s list to find new restaurants to try, including my most recent favorite: Agua 301 (seriously, their queso is to die for.) Remember to check out all recipes and past month’s feature at my website. Also, my subscriber count is at 81, and I want to hear from every one of you.
Some background: In a monthly newsletter, I combine a DC local’s story behind their favorite recipe(s), or ones that whip up some nostalgia, with photos and prose of my attempt at replication. These recipes vary in difficulty, but they are always ones close to the heart. This newsletter is sent on the third Sunday of each month as the name suggests. A fun note: Make sure to mark this email as NOT spam, move it to your inbox or add my sending address to your address book to avoid the newsletter regularly ending up in the abyss. Sometimes Mailchimp email campaigns go straight to spam.
Meet Anela.
If you follow the D.C. food scene at all, then you know FeedtheMalik. Anela, the face of the blog, is many Washingtonians’ go-to foodie for restaurant recommendations, especially after she compiled a directory of Black-owned restaurants in the DMV that were serving takeout or delivery due to Covid-19.
Anela says she started the blog while she was abroad as a way to document herself trying new things, but then she decided to continue to operate it once returning to the States. The driving purpose behind the blog, according to her, is to push herself to try new places that may not be on a local listicle, and to treat the whole experience like an adventure, even though she lives in D.C., which she says one of her followers pointed out. You can trust that her blog will distinguish the truly tasty from just the trendy (tasty>trendy as she says), while also broadening your horizons by trying new cuisines and eateries.
She says that the spotlight she signs on Black-owned establishments was a natural move, but also a conscious decision to help readers find those spots. Her identity as a Black and Asian woman paired with her mixed-ethnicity family has meant that food has always had very few limits. There’s nothing that Anela won’t eat, really. On top of that desire and willingness to try new things, Anela says she struggled to find thorough recommendations for minority-owned restaurants in the area, even in local papers’ roundups, so she filled that gap herself since there are so many to try.
She then created her directory, which has caused an uptick in customers for the businesses listed. One of the restaurant owners even said they saw about 40% of traffic on their site come from the directory, and others were able to rehire staff. The list originally started as a resource for Anela, but it’s grown into a wildly gratifying resource that took on a life of its own. She encourages people to take the list and learn new favorite places on there and make it a habit to frequent them in a change to their lifestyle that is valuable. She’s even been trying a new place every week with her husband. One of her favorites so far is Habisha, an Ethiopian market that features a $18 vegetable platter that was a feast for the eyes.
Her latest project? Matching those Black-owned businesses with services they need for free, such as PR or marketing. Anela says she’s matched at least 15-20 businesses so far with services that are typically more expensive because of the level of professionalism — quite a feat for someone who says she’s an amateur in this arena. She says she also included a downloadable PDF on her site all about food photography, which several people have downloaded.
Me pouring all the seasoning I possible can onto my dough.
Washingtonians always argue over what is the best bagel place in the area: Bethesda Bagels, Bullfrog Bagels, Call Your Mother, Bagels Etc. and more. But Anela doesn’t have a favorite, and that’s because she knows how to make her own bagels for her morning cravings. Very rarely does she follow anyone else’s recipes when baking for her site, but her bagel recipe, while it may look like other, is her’s and her’s alone after some experimentation. She says she chose this recipe because it’s her favorite of all time after making 50 versions of sourdough bagels before settling on this one.
This recipe specifically, according to Anela, is like every other sourdough baker’s recipe and she argues most sourdough baking is the same.
She says all sourdough bagel recipes will have a high protein flour, a small amount of salt and a high percentage of a starter, or a sponge made before starting the dough. Her recipe is unique, though, because she prefers using honey as a sweetener instead of sugar since it adds depth. It’s her own version of all the basic things in a sourdough bagel, but no added malt since she doesn’t like that strong of a flavor and no sponge since it is too complicated of a step.
For her, nothing she bakes today is being made for the first time since it is always an amalgamation of technique and experience,
but there is always a satisfaction in making a recipe you always thought looked too hard but isn’t that bad. The recipe is simply: you make the dough, let it rise, shape it, boil it and bake it! I can speak from first hand experience that, despite it taking a long time due to letting the dough rise, this recipe is not hard at all and very rewarding with delicious New York style bagels as the end product.
The recipe is simple with an added seasoning for flavor, but it can be adjusted to leave plain, or have a different flavor in it, such as chocolate chips.
Anela recommends a dry ingredient to not mess with the hydration of the dough, but I did ask for her advice on how to add berries I had picked at Butler’s Orchard. Following her advice, I added a little bit more water and dehydrated and chopped the berries, then folded them in. That definitely kept the bagel’s texture moist enough while also having a strong enough berry flavor from the blueberries and black raspberries.
Baking is always an exact science, and Anela definitely recommends exactly measuring out each ingredient for this bagel recipe.
Now that she’s made it so much, she can eyeball the ingredients. When it comes to cooking, she doesn’t follow recipes to such a T since she typically does what feels right, and it ends up working. Baking is more her style, especially sourdough. She taught herself sourdough baking when her husband was working in Kuwait for a year and she needed to fill up the time to prevent boredom.
She grew her starter and started experimenting by asking her digital community for recipes. She also set off on meticulously following her dusty, flour-stained cookbook, but now she’s super familiar with sourdough baking. Though she doesn’t consider herself a traditional sourdough baker creating the perfect oven spring in bread. She experiments instead with matcha cookies and other unique flavors to satisfy her cravings.
When Covid-19 hit the U.S. and most people started quarantining in March,
sourdough baking got so popular that followers started messaging Anela and commenting on her posts requesting that she upload her recipes to her website. She says those photos used to not get a lot of love on Instagram, but now people have more time to work with starters and can’t get enough of those recipes, so she moved them to her site.
She originally did not set out to putting recipes on her site, and resisted the urge to for a long time since recipe development takes up a lot of energy and she doesn’t measure when cooking typically, only when baking.
She shared photos of her cooking on her Instagram stories, which led to a flood of followers requesting she post the recipe. After a few months, she gave in and put in the time to make recipes people can replicate at home. She rarely follows others recipes, but she does try to post ones that support local businesses, like her recent roasted chicken using Uncle Dell’s mambo sauce. Anela frequently interviews local small businesses, preferably miniority-owned, and then uses their product in a recipe.
Boiling the bagels for 30 seconds on each side is super important.
Make your own delicious bagels for a perfect breakfast with this recipe.
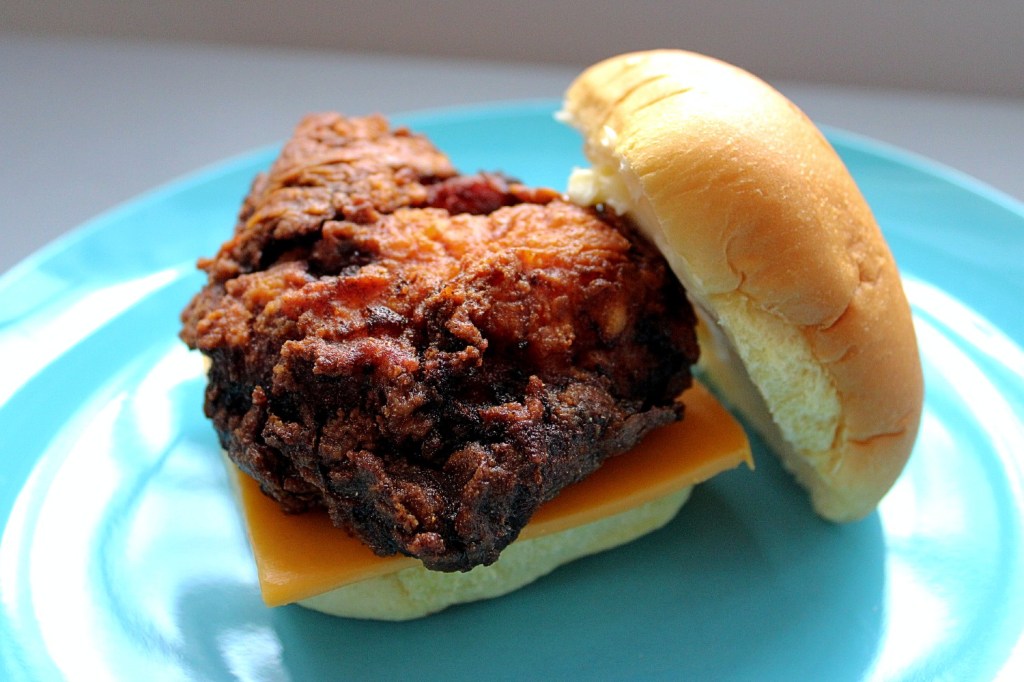
The honey butter melted into the spicy, crunchy chicken, then the cheddar added a kick of salt — perfection!
Bini really knows how to marry flavors to create the perfect union with this recipe. And even though my chicken looks too dark, it’s likely because of the amount of spices I used because I promise that chicken was cooked just right!
Editor’s note: this recipe is UPDATED based on a conversation with Roaming Rooster’s marketing manager, Jerusalem, who helped me identify an extraneous step I misunderstood from the video. It is now fixed, and is based on the big batch recipe provided to me and my best ability to guess measurements based on previous recipes and my chicken knowledge. I apologize for the error!
Updated, additional top tips: 1) My main mistake was adding an extra step, which I interpreted as a step but was really Bini prepping chicken into the marinade, then also showing the video’s host chicken that was already marinated. I adjusted the recipe below accordingly. 2) Toast your bun with a little bit of butter in the pan, cut side down, to make it crispier. I definitely forgot to do this in my rush to enjoy the melting honey butter. 3) Add more flour to the breading and pound your chicken thin enough (i.e. definitely about or less than 3/4 inch, unlike me) so that the breading does not darken too much. 4) The dipping sauce has similar components to the marinade and flour spice-wise, but you can adjust it to your heat preference, meaning add more cayenne for a hotter experience. Roaming Rooster have 5 spice levels!
Top tips from me: 1) Make sure to soften your butter fully before adding the honey. 2) If you can, use a brioche bun for your sandwich. If that’s not available, a potato or even hamburger roll works just as well, though it won’t be as structurally sound. 3) The chicken at Roaming Rooster is always free-range, grain-fed and antibiotic-free chicken breast. Some recipes use chicken thighs since they are fattier, but chicken breast will make sure you have chicken in every bite. 4) Make sure the flour for breading is thoroughly spiced. 5) According to Roaming Roosters’ owners, the trick is NOT to over-spice the chicken in the buttermilk marinade or the flour. Let the chicken bring out the flavors. 6) Timing when it comes to cooking the chicken is the most important thing, according to Bini, Michael and Hareg. If the chicken is over-cooked, it will be too dry, and it’s important to not overcrowd the pot. Make sure to use a heat-resistant frying thermometer to make sure your oil is at 300 degrees F, a temperature recommended by the chefs themselves, before dropping each piece of chicken into the pot. 7) My chicken breasts were too thick and had to cook longer, about 8-10 minutes in the oil, so some were too brown. Either use a meat thermometer to check if they’re done or cut the center to make sure it’s cooked through. 8) Use 6 to 8 cups of oil, whichever will make your chicken fully submerged. 9) Another suggested tool to obtain is a METAL slotted spoon, a spider strainer skimmer or, as I did, slotted tongs meant for frying. Be gentle with whatever you use. 10) I definitely suggest using a dutch oven or another pot that heats evenly to avoid your oil burning the chicken in some spots.
Time: It will likely take 30-40 minutes to complete the sandwich; however, account for at least 8 hours to 24 hours to let the chicken marinate properly in spiced buttermilk. This makes about 4 chicken sandwiches.
Ingredients: **Note, this is based on the video and my own guesses on measurements.** 2 chicken breasts, each cut in half — 1 cup buttermilk — for marinade: 1 tbsp onion powder, 1 tbsp garlic powder, 1 tbsp paprika, 1 tbsp cayenne, 1 tsp salt, 1 tsp pepper — 2 sticks of butter, room temperature — 6 tbsp of honey, to taste — for breading: 2 cups of flour, 1 tsp onion powder, 1 tsp garlic powder, 1 tsp paprika, 1 tsp cayenne, 1 tsp masa powder (fine corn meal), 1/4 tsp salt, 1/4 tsp pepper — 6-8 cups of canola or vegetable oil — for sauce: 2/3 cup canola or vegetable oil, 1 tbsp cayenne, 2 tsp each of paprika, garlic powder, onion powder — 4 cheddar cheese slices — 4 buns of your choice
Instructions:
– Pound chicken breasts to about an 3/4 thickness, cut in half vertically to about bun size.
– Combine 1 cup of buttermilk and the spices for the marinade in a medium bowl. Submerge chicken in the marinade, cover and leave in the fridge for 8-24 hours.
– Leave butter out to become room temperature. Once warmed, add honey and whisk to combine.
– Pour oil in dutch oven or pot and heat to 300 degrees F.
– Make the flour mixture in a large bowl. Dredge the marinated chicken in the flour mixture, making sure it is completely covered but with excess flour shook off.
– Prep the dipping sauce and whisk to combine. Feel free to add more cayenne to make spicier.
– Once the oil is properly heated, drop the chicken into it and let cook for 5 minutes until golden brown. Remove with skimmer, spoon or tongs. It is recommended to make sure the chicken’s temperature is 165 degrees F with a meat thermometer.
– Dunk each piece of chicken in the sauce briefly before adding to a cooling rack with a pan underneath to collect any excess sauce.
– Spread honey butter on the top half of the bun. Place cheddar cheese on the bottom half.
– Assemble the sandwich and enjoy! Maybe pair it with some pickles or french fries.
Did you make this recipe and have any suggestions? Make sure to leave a comment!
The June edition, in the midst of crucial protests, features a magnificent black-owned establishment in DC.
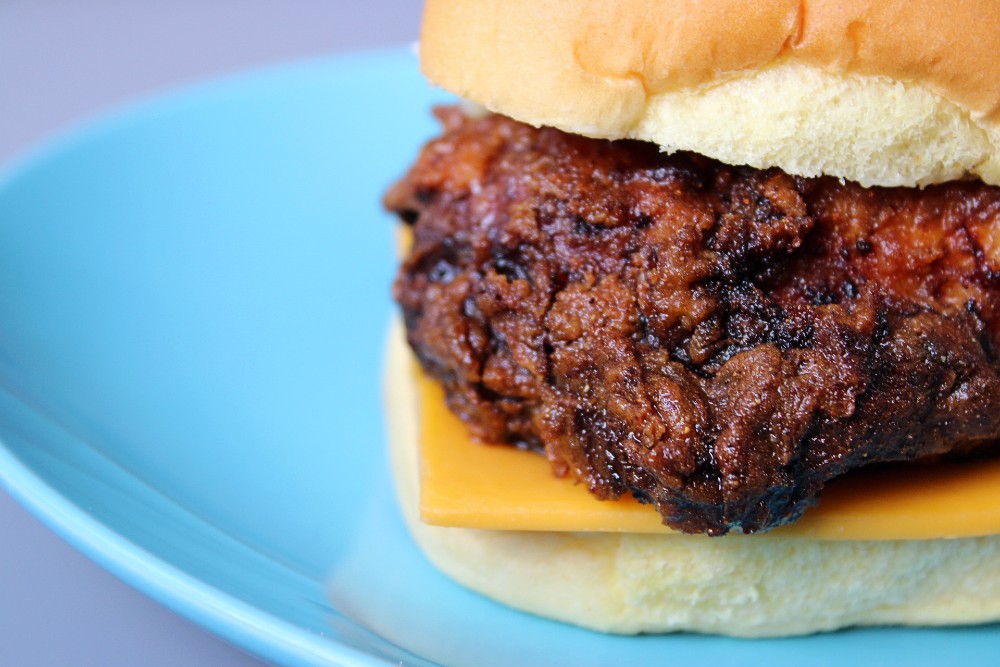
This insanely delicious and decadent chicken sandwich is unlike anything you’ll get from Popeye’s.
Welcome back to The Sunday Roast. At a time when the current state of the U.S. and the world weighs heavy on my heart, I always turn to the kitchen to relieve stress and pour my feelings into a recipe. The hatred and the undeniable systemic racism that people of color, particularly Black Americans, deal with is so disheartening. We must all listen to those that are at a disadvantage in this system, listen to anti-racist scholars and learn to change and grow. I hope you’ll join me in supporting black-owned local businesses as a small, conscious change, in addition to educating ourselves. You can even find D.C. area bakers that participated (or are still participating) in a #BakersAgainstRacism bake sale this weekend, and some even are Black-owned, so you can find which places to frequently get your goodies from now on. I just bought two delicious cupcakes from The Sweet Lobby in Capitol Hill!
This month: I took a hard look at my consumption habits and decided to support more Black-owned businesses in the historically Black city I now call home. I was inspired by all the love I saw from fellow foodies, especially FeedtheMalik, to work harder at my goal of diversifying the voices I feature in The Sunday Roast. On Twitter, I reached out to Roaming Rooster, one of the most locally famous restaurants in D.C., which I tried for the first time not too long ago and fell head-over-heels in love with, and was happy to see they were (only barely) free enough to answer my questions and send over a recipe. I know a lot of my fellow Washingtonians love this place and will be happy to learn one of their recipes. Remember to check out all recipes and past month’s feature at my brand new site, debuted last month. Also, my subscriber count is now at 81, and I want to hear from every one of you.
Some background: In a monthly newsletter, I combine a DC local’s story behind their favorite recipe(s), or ones that whip up some nostalgia, with photos and prose of my attempt at replication. These recipes vary in difficulty, but they are always ones close to the heart. This newsletter is sent on the third Sunday of each month as the name suggests.
A fun note: Make sure to mark this email as NOT spam to avoid the newsletter regularly ending up in the abyss. Sometimes Mailchimp email campaigns go straight to spam.
Meet Hareg, Biniyam and Michael.
This famous team makes the best fried chicken in D.C. at their family-owned Roaming Rooster restaurant on Bladensburg Road Northeast. Most Washingtonians already know about this restaurant, but are desperate to know the secret to their juicy, delicious chicken sandwiches.
Bini and Michael, two of the co-owners along with Bini’s wife Hareg, were born in Ethiopia and raised by a single father growing up. Their father taught them to cook, and Bini continued to do most of the cooking since he was the older brother, which led to his experimentation in the kitchen with different recipes. The family moved to Canada in 1994, and soon opened a sandwich restaurant, naming it Gooneys after the C-47 plane nicknamed “Gooney Bird,” a plan their father had survived a crash in. The business then grew with two extra stores in downtown Ottawa, but then in 2009, the brothers moved to D.C. so Bini could join his wife, Hareg, who’s from D.C.
The two wanted to start a new business in D.C. since Gooney’s hadn’t grown in the way they had hoped, so they sold the sandwich restaurants and used the funds and their food expertise to start a shawarma and poutine truck. Then they moved onto a vegetarian falafel truck and a pizza truck. They saw a gap in the market for good quality fried chicken, especially food trucks, so they experimented to perfect their chicken recipe while still operating DC Ballers, their falafel truck. Once the now-beloved recipe was ready to go, Roaming Rooster was born. The team started off with only one truck, but the popularity grew and now they own four food trucks, plus the brick and mortar opened in 2018.
Bini, Hareg and Michael are one of the most popular Black-owned restaurants in a city known as “Chocolate City,” and according to them, their success is “a testament to the ability of immigrants and black folks to work hard, overcome obstacles and stereotypes to become not only successful, but also a contributing community member.” During the Covid-19 pandemic, the store immediately transformed into a take-out counter, which Bini, Hareg and Michael say the community has continued to support. That has allowed them to provide free meals for health care workers at various DMV hospitals, while also partnering with protest organizers to provide meals for those marching in DC the past month. They say: “For us, it means a lot more than fried chicken. It’s about dreams, community, family, and love.”
The story behind their recipe.
The fried chicken at Roaming Rooster is heavenly. Seriously! You take one bite of the moist, crunchy, salty and perfectly seasoned chicken and you’ll never go back. I first tried their chicken and cole slaw salad, with a jalapeño kick in their vinaigrette-based slaw, and I was floored by the flavor in every bite. The bright cilantro added a fresh element to the juicy, greasy (though not too much) chicken and I instantly fell in love.
I already knew about Roaming Rooster and their delicious food from the August 2019 viral tweet that charged everyone to frequent the Black-owned, family-owned business instead of waiting in super long lines at Popeye’s during the chicken sandwich craze. Michael, Bini and Hareg say the D.C. community supported their food from day one, but the tweet really drove business. They said they appreciate the shout-out from the artist, which led to a lasting effect of an exploding volume of customers. The restaurant won Best of DC’s 2019 best fried chicken award, and even was a runner-up for best food truck, so their food spoke for itself before internet fame brought more Washingtonians out to Bladensburg Road NE.
When I reached out to Roaming Rooster via Twitter, they immediately responded and were open to coordinating an email interview since they were so busy serving up delicious food. I asked, which recipe would you like to feature, and they answered, the honey butter sandwich. I had salivated looking at the photos of their fried chicken, cheddar, honey butter sandwich on a brioche bun on their website, and I instantly understood why it’s their most popular item. Sometimes customers add dill pickles to the sandwich as a salty extra, but otherwise, it is perfect as is.
The other popular item, the Nashville hot chicken, is a favorite of the owners to sell — mostly because customers get confident and challenge themselves with the hottest spice level then start tearing up, followed by laughter and a request for water. They say the best part is seeing those same customers place the same order again. The honey butter sandwich can vary in spice level as well, but mild is popular and it’s the level I created in my attempt at a recreation of the sandwich.
Because the chefs at Roaming Rooster cook their food in large batches, getting specific measurements for the recipe was too difficult. The owners were kind enough to provide a video created by another food blogger that details the ingredients used in the sandwich, everything from the batter to the flour and the honey butter itself. Based off the ingredients and tips from the owners, and a couple of online recipes with measurements, I was able to compile the recipe below to help readers be able to create their own Roaming Rooster sandwiches when they need to stay at home.
Regardless, the most important ingredient is the creamy, sweet honey butter that melts on the hot chicken and contrasts with the salty breading and cheese. The popular recipe was developed by Biniyam, who always looks to try different recipes through combining ingredients to create unique flavors. The breading is a bit of a secret recipe, which is what makes their sandwiches so unique, but Biniyam shared some of the spices used in the video, so I was able to recreate the sandwich to the best of the ability and I’m eternally grateful to the Roaming Rooster team for educating me on how to make great fried chicken. Their final sprinkle of perfection in the sandwich? The brioche buns bought wholesale from Lyon Bakery in Hyattsville, Maryland.
More on those buns…
Lyon’s Bakery in Hyattsville is the leading artisan wholesale bakery that, according to Sarah, a sales manager, sells its delicious breads to most of the restaurants in the DMV, including Roaming Rooster and Michelin-star holding establishments. The bakery is minority-owned, with a CEO that identifies as Latina and and a COO, Alan Hakimi, from Iran. Alan actively travels to and lives in each place the dough used at the bakery originates from in order to make sure the recipe is perfected, then even ships the dough in from its originator.
Their manufacturing line is 6 feet long, so the work is very hands-on, using natural products without preservatives. Sarah said that the ceramic deck oven used at the bakery was custom made after Alan made a request, and the maker still makes the oven to this day. The bakery also holds the title of the oldest sourdough starter on the East Coast. Click here for more tips on sourdough starters, and here for more about Lyon’s Bakery. Unfortunately, our schedules were too different for me to obtain their delicious brioche, but I hope to try it someday (especially with Roaming Rooster’s sandwiches).
Join the craze but avoid the line: craft your own honey butter sandwich with this recipe.
This special edition for May features my great grandma’s recipe.
I’ve already eaten too much of this.
Welcome back to The Sunday Roast. I’ve got some great news: I made a website — thesundayroastnews.com! I have some experience with CSS, HTML and general site builders, so I figured I’d give creating a home for all my past newsletters a shot so that readers and future readers can peruse my content whenever they want. I’ve even created a page dedicated solely to all the recipes I’ve made so far, including my top tips for success, so anyone can pull up a favorite featured recipe to try out during quarantine. I hope everyone enjoys the website, and please feel free to leave comments, like and share any of the blog posts to let me know what your thoughts are!
This month: I debuted my site after weeks of hard work! Please give it a visit to see old newsletters and each recipe I’ve made so far. I also did a little photoshoot in my kitchen of the beautiful baby blue backsplash and decided I loved the photos enough to make it my new signature background! You’ll find the top of the newsletter now looks different to match the site’s design. Also, my subscriber count is at 78, and I want to hear from every one of you about more diverse subjects I can cover.
Some background: In a monthly newsletter, I combine a DC local’s story behind their favorite recipe(s), or ones that whip up some nostalgia, with photos and prose of my attempt at replication. These recipes vary in difficulty, but they are always ones close to the heart. This newsletter is sent on the third Sunday of each month as the name suggests.
A fun note: Make sure to mark this email as NOT spam to avoid the newsletter regularly ending up in the abyss. Sometimes Mailchimp email campaigns go straight to spam.
Meet Mary Ellen.
This is my great grandmother, Mary Ellen Egan — born in 1887. I never met her sadly since she passed away after my twin aunts were born in 1967, but I talked to my grandmother, Ann Egan, about her mother-in-law to learn about a family matriarch and where an important family recipe came from.
My grandfather, Phil, who unfortunately passed away last year in August, was one of Mary Ellen’s eight children. She was a stay-at-home mother, and while Egan is a very Irish name, her maiden name was Robinson and she was German. And just like my grandpa, Mary Ellen was born and raised in Albany, NY. She eventually married my great grandfather — also Philip — who moved from Connecticut, and stayed in Albany to raise my aunts, Winnie, Phyllis, Peggy, Betty and Aggie, and my uncles and grandpa, Skippy, Phil (or Buddy) and Vince. My grandma tells me that Mary Ellen was hard of hearing and usually sat around to listen, rarely speaking up until she had to give her two-cents worth. She did laugh a lot, however. Mary Ellen either lost her hearing at a young age or through childbirth, my grandma says.
Mary Ellen was known as a baker to her friends, family and neighbors, and she showed her love and kindness through baking homemade treats.
The story behind her recipes.
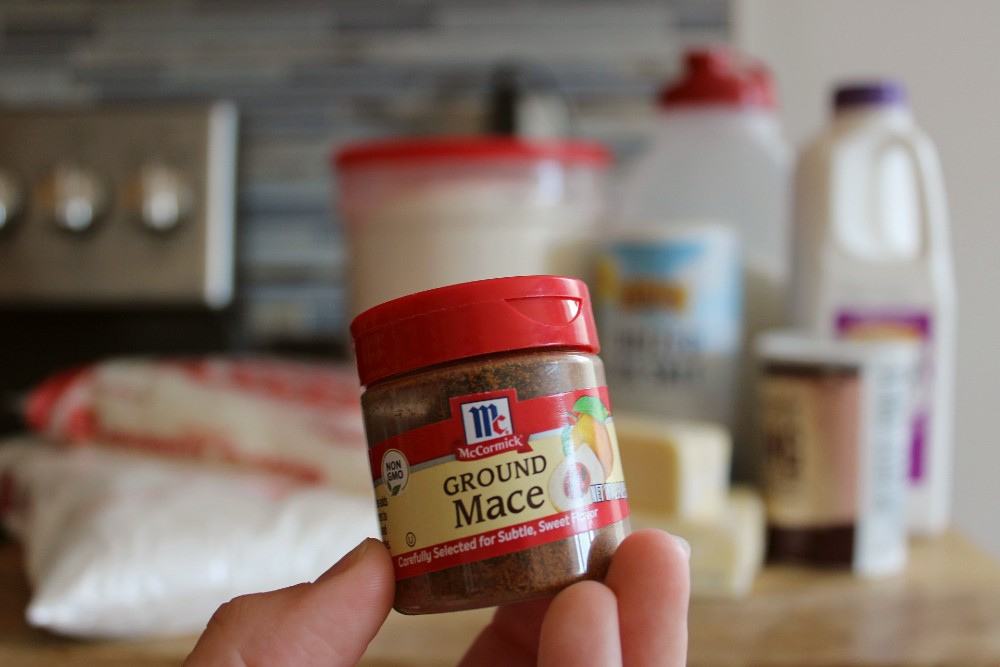
When I told my roommate I was making mace cake, she looked at me confused and I knew what was coming. No, this recipe does not involve mace spray, as you can see from the photo above. Mace, which I will describe more later, is a lovely, nutmeg-like spice that pairs well with curries and cakes. My grandma tells me it’s likely that Mary Ellen kept this spice around for whenever she needed it.
One day, Mary Ellen — ever the baker — decided to spice up (literally) the typical white cake she made for her family to change things up. She baked and cooked staples for her Irish family of 10 who lived in a small home and made do with what they had. Perhaps she was sick of just alternating between chocolate cake and white cake, my grandma says, so she reached for the mace in her spice cabinet and shook a teaspoon of it into the cake batter. Then, she reached for some shredded coconut and patted a bit onto the frosting. The end result: a perfectly moist, unique and flavorful cake that the entire family loved — a cake that wasn’t just coconut.
According to my grandma, some of the kids decided they hated coconut, so she adjusted the recipe to only put coconut around the sides of the cake — which she continue to this day. Then, she tried putting it on half the cake, but she noticed we started only eating the coconut half, so she returned to putting it on the sides. She also adjusted the white cake recipe to one that is more buttery and moist. But since then, my mother, my aunts, my cousins and I have been baking my grandma’s revised mace cake recipe and enjoying it each year with a scoop of ice cream alongside it at family birthday celebrations.
The mace stays in the cake for my family, and it’s a recipe I hope to keep passing down to my children. Try this wonderful cake in honor of Mother’s Day and let me know all your thoughts!
This sweet frosting is just the perfect amount of sugar to balance the mace in the cake. Plus, the recipe makes the ideal texture of buttercream for frosting a layer cake — a rare feat.
This buttercream holds up for any cupcake or cake recipe since it’s the perfect texture and sweetness.
Top tips from me: 1) Again, make sure your butter is softened. But, not too soft or the frosting may split with slightly melted butter. 2) Sift your powdered sugar to keep the frosting smooth and creamy. 3) I provided the measurements the recipe calls for in the situation of a layer cake, but I had to make even more (about a half batch) to make sure my cake had no blind spots or looked naked, then used the leftovers to pipe the little swirls on top.
Time: It’ll only take a few minutes to blend up the buttercream. Frosting the cake, however, may take a while if you’re not skilled at it (it took me about 30 minutes to bring it to a level I was okay with.)
Ingredients: 1/2 cup butter — 4 and 1/2 cups of confectioners sugar — 2 tsp vanilla — 3 tbsp milk
Instructions:
– Blend butter and sugar until creamy. Add vanilla and milk and beat until the frosting is smooth.
Did you make this recipe and have any suggestions? Make sure to leave a comment!
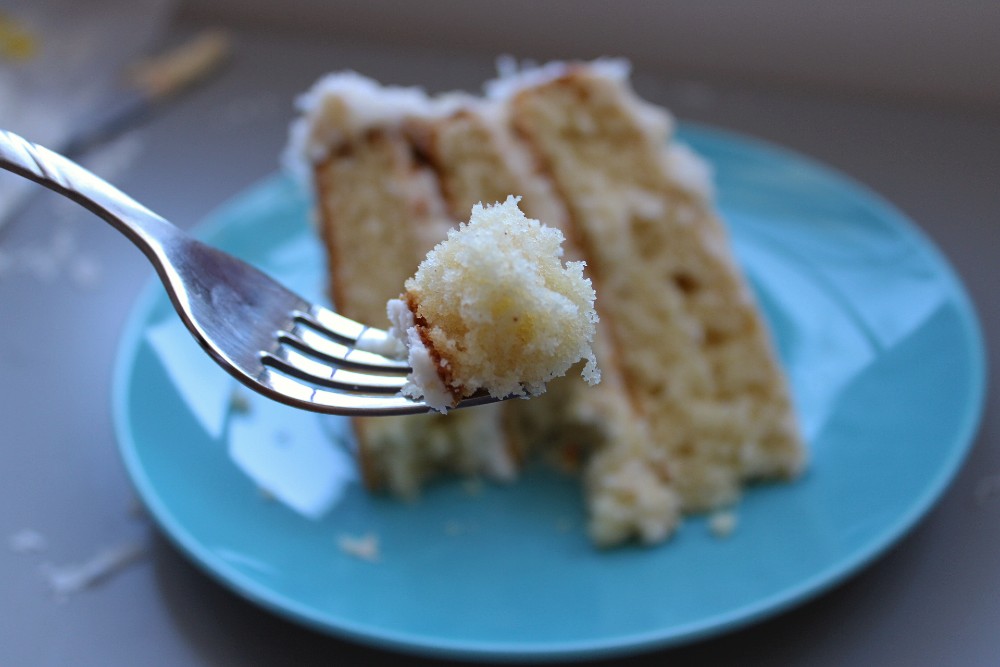
This is my favorite cake because it’s so moist, buttery and flavorful at the same time. It’s more than just your typical, plain white cake — and the crunchy coconut is the perfect add to the sweet, creamy vanilla buttercream.
Hear me out: this is the best cake ever. It’s the perfect amount of sugar, it’s moist, it’s go crunchy coconut to balance the frosting and it’s got a strong spice that adds a zing.
Top tips from me: 1) Make sure to soften your butter fully before starting your cake batter. You may need to take it out in the morning and bake in the afternoon. 2) Grease AND flour your cake pans! This will make it easy to pop them out. 3) Make sure to cream your butter, sugar, eggs and vanilla until they are smooth and creamy with no lumps. 4) Sift all your dry ingredients together — especially the mace — to make sure there are no lumps in the batter and that the mace is spread evenly throughout. 5) If you’re doing a layer cake, bake the cakes for a shorter amount of time, about 25 minutes, to avoid burning them. Sheet cakes will take about 45 minutes. 6) I suck at decorating cakes, but this one’s flavor matters more than its appearance. Put handfuls of coconut around the side so any frosting blemishes are covered up.
Time: To prep the cakes, you’ll likely only need about 20 minutes. The baking time depends on what form your cake is — sheet or two layers or three — but cooling time is about an hour before frosting. This cake will serve many many people!
Ingredients: 2/3 cup of softened butter — 1 and 3/4 cups sugar — 2 eggs — 1 tsp vanilla — 2 and 3/4 cups all-purpose flour — 2 and 1/2 tsp baking powder — 1 tsp salt — 1 ground mace — 1 and 1/4 cups milk — about half a bag of shredded, sweetened coconut
Instructions:
– Preheat oven to 350F. Grease and flour baking pans: 13 x 9-inch for a sheet cake, or two 9-inch or three 8-inch for a layer cake.
– In large mixing bowl, beat butter, sugar, eggs and vanilla until fluffy. Beat 5 minutes on high speed, scraping bowl occasionally.
– In a medium bowl, sift together flour, baking powder, salt and mace.
– Mix dry ingredients into wet on low speed, alternating with milk, until fully incorporated.
– Pour batter into pan(s) then bake 45 minutes if sheet cake, 25-35 minutes if layer cake, or until a toothpick inserted into the center comes out clean.
– IF MAKING A LAYER CAKE: Cool the cake in the pans for about 7 minutes before flipping out on to a cooling rack. Let the cakes cool for at least 30 minutes before frosting. To frost, make sure bottom layer(s) have even surfaces, then apply and spread a half-inch layer of frosting between each layer. Once layers are stacked, frost top then sides with a similar thickness. If the first layer is a crumb coat, feel free to apply another thin layer. Decorate the top however you’d like with leftover frosting, then lightly pat handfuls of coconut onto the sides of the cake until fully covered.
– IF MAKING A SHEET CAKE: Cool the cake in the pan for at least 30 minutes. Fully frost the top of the cake, then sprinkle coconut over the top.
Did you make this recipe and have any suggestions? Make sure to leave a comment!
Learn how to make tangy sourdough from the beloved FermentDC in the April edition.
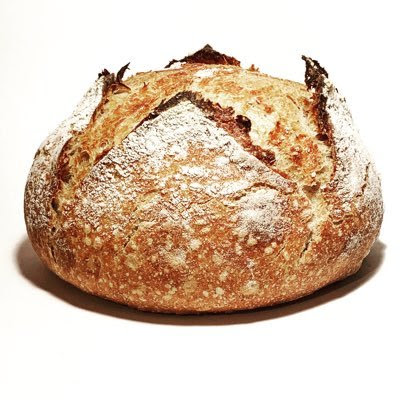
My dense, slightly flat, yet super delicious loaf.
Welcome back to The Sunday Roast! Before we get started, I wanted to shout out all my fellow journalists who are working so hard to bring crucial information to the public during a pandemic. I hope all my friends in media are also taking some time for themselves, and maybe this month’s edition will help them find something new to try! And while the news becomes stressful and overwhelming to consume, I hope my readers can find some solace in writing focused on something we all love: food.
As you all know, baking is one of my favorite ways to relax and relieve stress. I have always wanted to learn how to bake bread in particular because my grandfather was a wonderful bread baker. I decided to focus this month’s newsletter on bread to not only expand my skills, but also to honor his memory. Plus, I’ve seen a lot of people crafting sourdough starters and lovely subsequent loaves, so I know it’s on a lot of people’s minds as a quarantine activity. The ingredients for this month’s recipe are fairly easy to come by: flour and water. If you don’t have flour, please heed experts’ warnings, like in this lovely Atlantic piece, and go to the store at off-peak hours wearing a mask or order for pickup or delivery.
This month: Please fill out my suggestion form! My subscriber count is still 77, and I want to hear from each and every one of you about more diverse subjects I can cover (and yes, I will look into baking dog treats, Aunt Beth).
Some background: In a monthly newsletter, I combine a DC local’s story behind their favorite recipe(s), or ones that whip up some nostalgia, with photos and prose of my attempt at replication. These recipes vary in difficulty, but they are always ones close to the heart. This newsletter is sent on the third Sunday of each month as the name suggests. A fun note: Make sure to mark this email as NOT spam to avoid the newsletter regularly ending up in the abyss. Sometimes Mailchimp email campaigns go straight to spam.
Meet FermentDC.
The photo of the loaf may be plain, but @FermentDC is known to locals as simply “The Bread.” And since the identity of The Bread is a secret (which they say is so the focus remains on the bread and not the person baking it), I will use singular “they/them” pronouns.
FermentDC started out as a personal account, baking and giving away bread to friends in DC to spread joy after they quit their job. Then, their bakes became so popular that The Bread started receiving random replies from strangers, so they moved to a separate account. Despite their love for fermenting a variety of things, hence the Twitter handle, the promise of delivering kimchi, kombucha and other fermented things never caught on quite like the famous bread boules. As an added bonus it’s easy to travel with bread, and The Bread typically delivers their hand-crafted loaves via bike in downtown DC.
The way the account works: The Bread bakes a loaf, photographs it and then tweets a prompt for followers to reply to, such as choosing lyrics to add to a graphic about properly washing your hands (the winner of which was definitely Rickrolling). The Bread is beloved all over DC Twitter, and even has been profiled in local media when the account debuted around November of last year. But now, during the craziness of the pandemic, The Bread has been doing whatever they can to help people. It’s a bit hard to deliver bread to strangers during a time when social distancing is a must, they say, so The Bread has been delivering loads of sourdough starters instead, including my own! “It’s a small thing I can do during this crisis,” they say.
Just like the expectation of delivering tangy bread stuck, the name “The Bread” also stuck after Washington City Paper’s food editor Laura Hayes tweeted: “THE BREAD … was small but exquisite” after another member of the newsroom won the bread of the day. The Bread’s following grew and grew — now just over 2,000 followers — to the point where they were baking multiple loaves a day and people thought they were an actual bakery! But over time, The Bread has gotten back to that core message of spreading joy through bread. They have given away over 50 breads and 50 starters. There was a lot of demand for starters in mid-March when the pandemic was declared a national health emergency, but The Bread recommends people create their own since it only takes about a week.
Baking sourdough bread requires a lot of patience. With the time it took to build a strong starter for the basis of my bread, it took me about two weeks to finally get that end product of a delicious, tangy, crackly crusted loaf. But if you arm yourself with some research, especially bread baking books, YouTube videos, Instagram foodie accounts or baking blogs, you’ll get a tasty loaf your first time around. The Bread generally refers people to “In Search of the Perfect Loaf: A Home Baker’s Odyssey,” which was written by DC local Samuel Fromartz, or www.theperfectloaf.com.
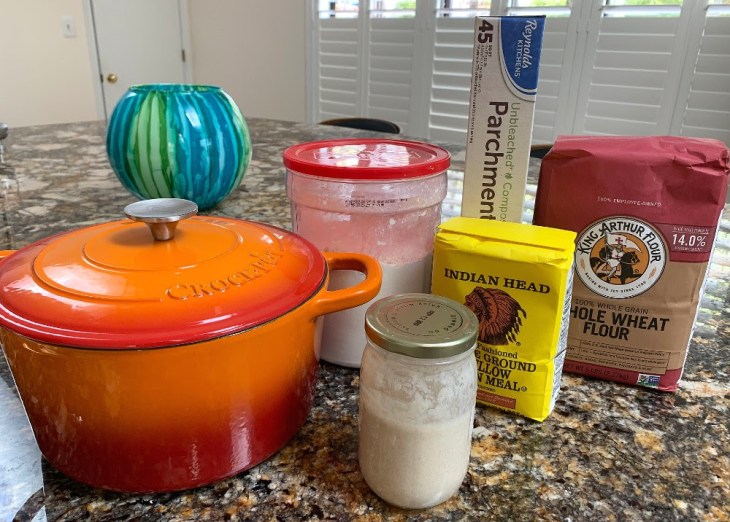
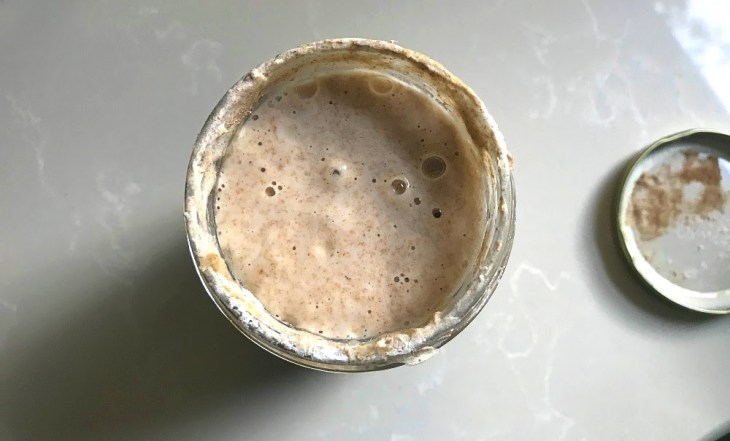
So far, The Bread has stuck to labeling their’s by age and provenance. I, however, named mine Cheryl. She was quite testy, as The Bread warned me she might be, but I managed to get her under control with daily feedings and she predictably rises and falls now. I feed her with whole wheat flour and all-purpose flour, as per The Bread’s suggestions. I even managed to make a second starter with some of Cheryl to give to my aunt. Feeding a starter can be stressful and unpredictable in two weeks, but once you start to see that rise and fall and stick to certain measurements each day, you will feel more reassured in how to take care of your starter. Using only all-purpose flour at first proved to not work for me, so I managed to pick up some whole wheat flour to get the fermentation going faster after The Bread suggested it. Other blogs, including the one they pointed me to, suggest rye flour, but The Bread said it’s too hard to find rye flour even without a worldwide pandemic.
Now, when it comes to baking bread, most bakers, amateur or professional, use percentages of the overall dough as their measurements. The Bread did not provide me with a specific recipe since there are so many out there, but they do have favorite percentages: 10% kamut, 20% wheat flour, 30% all-purpose flour, 40% bread flour, 79% hydration and 15-20% levain. This magical combination has become their go-to bread, but for parties and other events, The Bread tends to minimize the wheat to 10% and make up the other 90% with all-purpose and bread flour. Their favorite combination is kamut and buckwheat flour in sourdough since the flavor is unique and full of childhood nostalgia, though many people are using all-purpose, bread or whole wheat flour for their quarantine starters.
Want to learn more about how to craft your own sourdough starter and bread boule?
CLICK HERE FOR THE FULL RECIPES!
My testy starter is lovingly named Cheryl.
Processing…
Success! You're on the list.
Whoops! There was an error and we couldn't process your subscription. Please reload the page and try again.
Even the Kennedy Center loves Meghan’s intricate treats, featured in the March edition.
A taste of the cookies Meghan let me sample. Yes, I’m clumsy and broke them, sadly.
Welcome back to The Sunday Roast! I hope everyone is staying safe and healthy, and hopefully not too bored while working from home.
I decided to focus this month’s newsletter on a fairly easy crowd-pleaser that you can make while self-quarantined to make the time pass. Baking is one of my favorite ways to relax and relieve stress, so try your hand at doodling on some cookies to switch it up. It’s super easy to order the ingredients needed for decorating online, as this month’s subject does, so no need to risk heading to your local store. Ideally, you’ll already have the staples for baking in: sugar, powdered sugar, butter, flour, eggs and vanilla. If not, please heed experts’ warnings, like in this lovely Atlanic piece, and go to the store at off-peak hours if possible. Practice social distancing, and decorate cookies to your heart’s desire for hours on end!
This month: My ongoing goal, still, is to diversify my subjects to make sure I’m talking to all the different people that live in this beautiful city/area. I am still very open to any suggestions people have, including who or what you’d like to see featured in future newsletters. Just fill out my suggestion form! My subscriber count has now gone up to 77 and I hope to keep growing that with a new goal in mind.
Some background: In a monthly newsletter, I combine a DC local’s story behind their favorite recipe(s), or ones that whip up some nostalgia, with photos and prose of my attempt at replication. These recipes vary in difficulty, but they are always ones close to the heart. This newsletter is sent on the third Sunday of each month as the name suggests. A fun note: Make sure to mark this email as NOT spam to avoid the newsletter regularly ending up in the abyss. Sometimes Mailchimp email campaigns go straight to spam.
Meet Meghan.
A data scientist by day and a cookie baker at … almost all other hours. Meghan has been baking dozens of cookies since she was a little girl helping her mother decorate batches for the holidays. Her mom would shape and bake the cookies, and Meghan would decorate.
As she grew older, Meghan kept evolving her decorating skills when she would bake for friends and family for fun or a special occasion. She would regularly feature her creations on her personal social media, so naturally, after glimpsing her beautiful baked goods, Meghan’s friends encouraged her to showcase her work on a separate account for all to see. She would update the account occasionally, but because she was a full-time high school math teacher, who also was an adjunct at Georgetown, she tended to leave the account untouched.
Then, in November 2018, her all-boys high school was abuzz from the scandals surrounding the Supreme Court Justice Brett Kavanaugh hearings. Meghan was overwhelmed and fired up, so she baked, of course. She felt she was missing a creative outlet because she taught math, so she challenged herself to decorate and post one Christmas cookie design per day for 30 days in between Thanksgiving and Christmas. The orders started pouring in halfway through the challenge. Shop Made in DC, which features many products from local makers, asked Meghan to participate in a pop-up for Valentine’s Day. As a native of the area — specifically Silver Spring — she was thrilled to take the opportunity, and ever since, her cookie decorating career has soared.
Meghan now teaches classes regularly at different maker spaces, such as Shop Made in DC, Milk Bar in Logan Circle, Steadfast Supply in Navy Yard and Olive & Loom in Rockville. Meghan says her true passion lies in teaching, so the opportunity to teach the tips and tricks of royal icing was exciting. She’s part of a supportive and collaborative DC maker community and has had many high profile customers for her cookie orders, ranging from personalized cookies for her friend’s wedding to rainbow-themed treats for the annual Kennedy Center Honors ceremony. Her hobby has slightly turned into a side hustle, though she knows how to set limits so she doesn’t take too many orders, and she’s not ready yet to turn it into a full-time business. Cookies, for Meghan, are still a treat she loves to make for others to give them something pretty and make them smile.
Pictured above are my attempts at decorating sugar cookies in a similar manner to the way Meghan artfully decorates her’s. I wouldn’t say mine are in the same league as Meghan’s cookies; however, she did say it takes years of practice to get them looking perfect. Since she’s been decorating since she was 5 years old, I think I did pretty damn good for my first time decorating something other than piping icing on a cupcake or slapping buttons on a gingerbread man. I was unable to find a shamrock cookie cutter under the circumstances (i.e. Giant did not have them and Walmart and Target would only deliver in about 5 days), so I managed to cut out a stencil in wax paper, then use a paring knife to cut out the shape in the rolled out dough. While the green is about as vibrant as a McDonald’s shamrock shake, I still think they look festive enough considering no events on the holiday will happen in nearly any city!
Regardless of my attempts, Meghan was kind enough to gift me examples of her own and they were not only beautiful (before I broke them to bits), but they were the perfect mix of sickly sweet icing with a chewy sugar cookie that had a dash of salt. These puppies are delicious, and the dough is quite easy to make. The icing can be more tricky, as Meghan warns, mostly because the consistency needs to be spot on, but otherwise, these two recipes are the ideal crowd-pleaser.
The sugar cookie recipe is modeled after Meghan’s mom’s recipe that she utilized for many Christmases. Meghan says this recipe is almost identical, but she did play with the quantities a bit so they’d be easy to memorize — one stick of butter, two cups of flour, etc. She can easily double the recipe without looking it up, and the dough comes out as soft and buttery as ever. This recipe, while it can stand on its own, is ideal for decorating because the rolled out dough does not rise when baking so there’s always a flat surface for the icing to set on. The cookies end up tough on the edges but chewy in the middle — the perfect sugar cookie if you ask me.
Now for the tricky royal icing. Meghan says her recipe is similar to many found online, though some people add corn syrup to make the icing finish shinier. Her’s is only three ingredients, so it seems very easy, but getting the consistency just right is key, which can be hard for a first-timer. If your icing is too thick or too runny, don’t risk plowing through, Meghan says. Either add a bit more water or sugar, or dump the batch and make a new one. It’s always easier to add more water to lighten up the icing than it is to thicken it with sugar, so be cautious with the water, she warns.
The purple icing I made ended up being a bit too runny, so I added more sugar and used it very sparingly since I did not have enough powdered sugar to make a new batch. Meghan says you must have patience with yourself, however, because even she still gets the consistency wrong sometimes. Once, she made a large batch before a class but the icing split, so her husband went and bought the supplies for her to make a whole new batch just before the class. Meghan encourages new bakers to get creative with your decorating with food coloring, piping bags, toothpicks to create designs, edible metallics and all the sprinkles you can get your hands on.
I settled on edible metallic spray, edible pens, food coloring, toothpicks and piping bags to make my designs, and I bought most of these plus meringue powder for pickup at a Walmart, all linked, so feel free to do the same! I already had cute cookie cutters gifted to me by my mom, but several sites have a lovely selection of cookie cutters available for delivery.