Category: Recipes

  • Sourdough bread

    Sourdough bread

    Oh. My. God. My loaf is not perfect by any means but I am so proud of it!! The tang! The crisp crust! The chewy inside! Those air pockets! I cannot believe I made  bread and that it tastes like this. Everybody needs to try this at least once! Melt some butter on this bad boy and nothing can be better. I immediately made soup to dip the bread in as well, and I have no regrets.

    Making tangy sourdough bread with a crunchy crust takes lot of patience, but it’s sure worth it.

    Top tips from me:
    1) Linked below is the 19-minute-long video that The Bread sent to me to follow. It’s fairly easy to follow, though your dough may end up looking slightly different than her’s, as mine did, too.
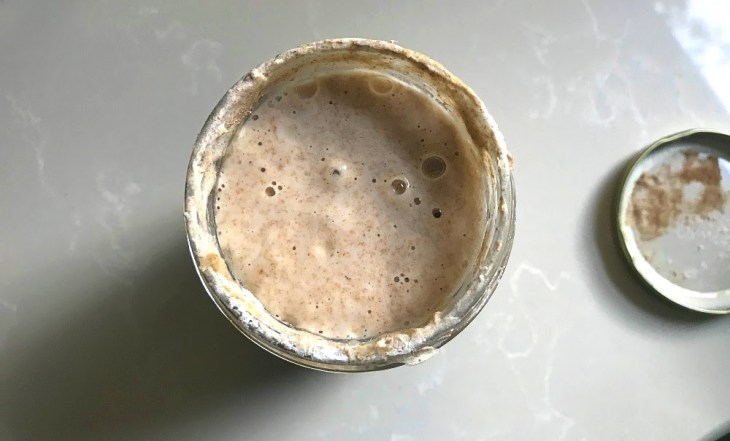
    2) When adding your starter, it should be about 6-12 hours after feeding when it has risen to its peak. Plan ahead and feed your starter well before you start making your dough.
    3) The measurements, just like the starters, may be a bit off when it comes to converting them to cups, so make sure the consistency of your dough always matches that in the video, even if that means adding more flour.
    4) I ended up only doing the three folds like the baker ends up doing in the video.
    5) Feel free to just use all-purpose flour instead of brown rice flour if you don’t have it. Definitely make sure you use semolina and that the parchment paper is properly cut, though, to avoid your loaf sticking to the dutch oven.
    6) I proved my dough in some Corning ware since I don’t have a banneton, which may have affected the shape. I also bought a dutch oven to bake my bread in, since my research told me that was easier with the steaming process, so another video is linked below to explain how to bake your bread that way.
    7) After talking to The Bread again, my theory is that I should have used my starter 8-12 hours after feeding, folded my dough one more time, shaped it 20 minutes just before baking and increased the temperature to 500 degrees. I will experiment and see what works for a better rise next time!

    Time:
    This recipe is long and tedious, but extremely worth it. It will take about 6-8 hours for you to finally get your dough shaped, then an overnight proof for 12-16 hours, then baking for 40 minutes — so definitely do this on a weekend or slow day at work. You will get one medium sized loaf out of this.

    Ingredients:
    70 g whole wheat flour — 255 g all-purpose or bread flour — 253 g water — 65 g starter (called levain) — 7.5 g sea salt (or table salt) — extra water and flour for folding and shaping — brown rice flour and semolina/cornmeal to sprinkle on loaf 

    The easiest method to bake bread! Follow this video for specific baking instructions.

    Instructions:

    A QUICK OVERVIEW OF THE STEPS: autolyse — levain — sea salt — fold — lamination — stretch and fold #1 — stretch and fold #2 — stretch and fold #3 — shape — proof — bake

    – Add 70 g of whole wheat flour, 255 g of all-purpose/bread flour and 253 g of water to a large mixing bowl. Stir to combine until no dry flour remains and the consistency is a wet yet stretchy dough.

    – Let the dough sit covered for 3 hours. After, wet your hands and gently pull at a section of the dough to make sure it stretches without ripping.

    – Add in 65 g of your starter that has been sitting for at least 6 hours since feeding. Wet your hands again and hand mix in the starter for about 3 minutes until fully incorporated. 

    – Let the dough sit covered for 30 minutes.

    – Add 7.5 g of salt to the dough. Wet your hands and hand mix for another 3 minutes until fully incorporated. 

    – Let the dough sit covered for 30 minutes.

    – Lightly wet the counter and your hands. Scrape dough out of bowl onto counter. Use a wet knife or bench scraper to release the top of the dough from the counter, and then stretch the top out before folding down to the bottom of the dough.

    – Repeat the folds on all 4 sides of the dough.

    – Round the dough and return it to the bowl. Let the dough rest covered for 30 minutes.

    – Lightly wet the counter and your hands, scraping the dough out of the bowl onto the counter again. Use the knife or scaper to lift edges of the dough.

    – Grab the edges, lift and gently pull the dough to stretch it from the center. Release the edges onto the counter. Repeat on all four sides until a large rectangle is made.

    – Pick up one side of the stretched dough and fold it towards the center, covering about 1/3 of the remaining dough. Fold the other edge on top of the rest — effectively folding the dough in thirds.

    – Pull the top of the dough down halfway and then the bottom up over the top section. Now, you should have a folded dough in the size of a smaller square.

    – Move the dough to a dish, such as a Pyrex dish or Corning ware. Let dough rest covered for 45 minutes.

    – The dough should have expanded to the size of the dish. Wet hands and lift dough from center to let the top fold underneath. Repeat this until all sides have folded until the dough to make a small square again. Let dough rest for 45 minutes.

    – Repeat previous step at least three times, or until dough is puffy, feeling sturdy enough and has roundness in the edges.

    – Flour the counter and the bottom edge of the dough in the dish. Using floured hands, scrape the top of the dough out of the dish, then flip and let it slide out onto counter. Use your knife or scraper to bring flour under the dough.

    – Gently pull the top of the dough and fold halfway over the dough. Repeat for the bottom. 

    – Grab the side of the dough which has not been folded yet and roll it tightly into the dough, creating a loaf shape. Seal all seams in the loaf, including on the sides not rolled.

    – Dust dish meant for proving and top of dough with flour (brown rice or whatever is handy). Flip the dough into the proving dish with floured surface on the bottom. Cover and prove overnight in the fridge for 12-16 hours.

    – Preheat oven at 475 degrees with dutch oven inside.

    – Cut parchment paper in shape of bottom of dutch oven with two flaps for easy removal. Flip dough fresh out of fridge onto parchment paper on a flat surface. Transfer dough with parchment paper on the bottom to the preheated dutch oven.

    – Bake bread covered for 20 minutes.

    – Reduce heat to 450 degrees and bake bread uncovered for at least 10 minutes. Bake longer for a browner crust.

    -Enjoy!

    Did you make this recipe and have any suggestions? Make sure to leave a comment!

  • Sourdough starter

    Sourdough starter

    This recipe isn’t necessarily from The Bread, but they recommended I follow it for a week to get the perfect starter – and boy, is it bubbly! Making this starter can be hard, meticulous work, so buckle up for an extensive step-by-step, but it’s got a rewarding tang.

    This bad boy can make pretzels, pizza crust, bread, pancakes, cakes, biscuits and much more!

    Top tips from me:
    1) Get a mason jar or a pasta sauce jar and clean it out! This will be what you create your starter in, and make sure to leave the lip gently placed on top without screwing it on tight.
    2) Get. A. Lot. Of. Flour! Get as much whole wheat and all-purpose, maybe even bread, flour as you can. One big bag of each should suffice.
    3) Every baker ever, including The Bread, will tell you to carefully watch your starter as it rises and falls within 12-24 hours of feeding. Maybe mark where it starts with a marker or rubber band to see your progress.
    4) Don’t stress about precise feedings every 12 hours on the dot, but do make sure you feed it after it falls all the way before any brown liquid (called hooch) forms on the surface. That happened to me a couple times, so if it does to you, just pour that off the surface, stir and feed.
    5) Some bakers may be angry at me for this, but: if you don’t have a food scale, find a conversion chart for grams to cups and measure out your ingredients that way. This goes for the bread, too, and it worked just fine for me.
    6) Keep your starter in a warm place in the kitchen. Turning on my oven light and leaving my starter on the rack worked well for me; however, make sure you take the starter out when you preheat your oven for other stuff. Too much heat over 140 degrees can actually kill your starter since that’s too hot for yeast.
    7) A big stipulation for this recipe: I sometimes had to eyeball measurements to make sure the consistency was accurate based on the photos. Don’t be afraid to add some more flour or less water if needed.
    8) Also, it is totally fine to exclusively use all-purpose flour; however, The Bread recommends whole wheat flour to help speed up the fermentation process.

    Time:
    Assembling the starter will only take minutes, and feeding it each day will take about 10 minutes. Your starter should be steadily rising and ready to use within 6-9 days!

    Ingredients:
    TO CREATE YOUR STARTER: 100 g of whole wheat flour, 150 g of water
    FOR EACH DAILY FEEDING: 50 g of whole wheat flour, 50 g of all-purpose flour, 100-125 g of water

    *These feeding amounts may differ in the first few days, please refer to the instructions or the site that the recipe originates from.*

    Instructions: 

    – Assemble starter in clean jar and stir until flour is fully incorporated. Place in warm spot that will keep starter around 80 degrees F.- For the next two days: 24 hours after prior feeding, take out 75 g of starter and discard the rest. Clean the jar, add the starter, 50 g of whole wheat flour, 50 g of all-purpose flour and 125 g of water. Stir until incorporated and put back in warm spot.

    – For the next three days: use the same measurements as previous days, but increase frequency of feedings and make sure to feed every 12 hours (approximately). Then let starter rest overnight. You should start to see fermentation activity with bubbles.

    – A week later (and next few days if necessary): every 12 hours, discard mixture down to 50 g. Add in 50 g whole wheat flour, 50 g all-purpose flour and 100 g of water. Mix until fully incorporated and place back in warm spot. At this point, you should see your starter rise and fall predictably every day.

    – I’ve seen different tips for how to care for starters after they’ve begun fermenting, so typically you should continue to feed it once a day to your own standards, perhaps the measurements used in the last few days, if you plan to regularly use it. Otherwise, feel free to refrigerate your starter as a sort of hibernation before feeding again.

    Did you make this recipe and have any suggestions? Make sure to leave a comment!

  • Royal icing

    Royal icing

    The sweetness of powdered sugar mixed with the tangy meringue powder adds just enough sweet to the soft sugar cookies. The consistency of icing allowed it to set well on the cookies.

    A classic recipe everyone should know — plus, Meghan found the perfect combination that decorates well and tastes good.

    Top tips from me:
    1) This recipe may seem simple and easy, but getting the consistency right so that the icing can set well can be tricky. Meghan recommends adding a teaspoon of water at a time until the consistency is just right (not too wet but not too thick). There are about 3 teaspoons in each tablespoon, so just run the mixer while adding them. I did about 7-8 teaspoons.
    2) Gel food coloring is better to use for more vibrant colors, but I only had regular food coloring. That worked just fine as well.
    3) Use disposable piping bags to pipe the icing onto the cookie. I used ones from Wilton’s baking ware and they worked just fine. If you’ve never piped before, make sure to push the icing towards the tip of the bag, twist the top to create pressure and then cut a small hole in the tip of the bag.
    4) Line the shape you want on your cookie, let that dry, then flood the cookie with icing just so there’s enough there. Then take a toothpick and using the flat edge, spread the icing to cover the whole shape on the cookie. 

    Time:
    This recipe yields a lot of cookies – probably about 3-4 dozen. Additionally, make sure you leave enough time. It will take about 30 minutes to make the meringue then another 2 hours to bake the cookies.

    Ingredients:
    2 cups confectioners sugar —1 tbsp meringue powder — 3 tbsp water

    Instructions:

    – Beat all ingredients together until stiff peaks form (4-7 minutes). You may have to add more water depending on the weather. Add a teaspoon at a time while mixing to achieve desired consistency.

    Did you make this recipe and have any suggestions? Make sure to leave a comment!

  • Sugar cookies

    Sugar cookies

    These sugar cookies are perfectly chewy while being sturdy enough to keep their shape and easy to frost. The dash of salt cuts through the sweetness for the ideal bite.

    Making chewy, buttery sugar cookies and decorating them to the nines is the perfect quarantine activity.

    Top tips from me:
    1) Meghan’s number one tip is to not let the cookies brown in the oven. A few of mine were too thin so they did, as you can tell by the photo, but otherwise: heed her warning so they stay chewy!
    2) Preheat your oven for at least a half-hour so that the temperature is even through-out, Meghan says.
    3) Sift all your flour and baking soda to make sure they are no clumps!
    4) My dough did not clump up in the bowl, so I poured the crumbs over some laid out plastic wrap then kneaded it a little with my hands into a disc.
    5) Make sure to chill your dough for at least an hour. You can leave it in the fridge overnight as well. This will help it keep its shape.
    6) Don’t roll the dough too thin! Make sure it’s about a quarter of an inch or so, otherwise some cookies with rip or break or brown just too much.
    7) Feel free to cut out a stencil to make a shape you’d like, similar to what I did with wax paper to make a shamrock, but a cookie cutter will absolutely make neater lines.

    Time:
    Assembling the dough will take about 20 minutes, then the cookies will bake for 8-12 minutes. They will also need at least 15 minutes to cool before icing. This recipe yields 2-3 dozen cookies, depending on the size cutter you use.

    Ingredients:
    2 cups all-purpose flour — 1/2 tsp salt — 1/2 tsp baking powder — 1/2 cup unsalted butter  — 1 cup sugar — 1 large egg — 1 tbsp high-quality vanilla extract

    Instructions: 

    – In a large bowl, cream butter, sugar, egg and vanilla until pale and fluffy.

    – Sift dry ingredients into the bowl, and mix until incorporated. 

    – Shape dough into discs, cover with plastic wrap and refrigerate for at least 1 hour or overnight.

    – Preheat oven to 350F. Line baking sheets with baking mats or parchment paper.

    – On a lightly floured work surface, roll out dough, cut into desired shapes, and transfer to prepared baking sheets, leaving an inch in between. Leftover dough can be rolled and cut once or twice more.

    – Bake until lightly golden, about 8-12 minutes depending on the size and your oven. Do not allow to brown.

    – Transfer to wire racks to cool for 15 minutes.

    – Decorate to your heart’s desire.

    Did you make this recipe and have any suggestions? Make sure to leave a comment!

  • Tomato basil cheezy bread

    Tomato basil cheezy bread

    DANGER: These are way too addictive. I’ve eaten so many already. The fluffy, eggy biscuit contrasts with the creamy sharp cheddar with a fresh burst from the tomatoes. The basil ties it all together to make a lovely pizza-tasting roll. 

    I once made a cheddar grilled cheese with these and it changed my life. Make these for a great lunch option!

    Top tips from me:
    1) Cut your butter into small chunks so it melts faster and the milk does not scald, Jaimie says. Also, make sure you use a large pot.
    2) Make sure you add one egg at a time when making the batter, otherwise you may not mix fast enough and some of the egg will cook into scrambled eggs!
    3) Definitely add the water to make sure the dough is more consistent and like a paste, otherwise, it will clump up and the mix-ins may not be fully incorporated.
    4) Instead of adding spring greens, I chiffon cut up about 10 large basil leaves and added those in. Perfect basil heaven, and I got to use my basil plant. I would definitely recommend fresh basil.
    5) Here’s an eating tip: Jaimie says it is absolutely essential that you toast your cheezy bread before eating it. I agree.
    6) Jaimie uses a scale and ounce measurements for her recipe since she’s a professional baker, but she was nice enough to give us approximations so if you don’t have a scale, you can still make these.

    Time:
    Assembling the dough will take about 30 minutes, depending on your knife skills and how long it takes for your milk and butter to boil, then the rolls will bake for another 45-60 minutes. This recipe yields 1 dozen sandwich-sized rolls or 2 dozen dinner rolls.

    Ingredients:
    12 oz. whole milk (a cup and a half) — 6 oz. butter, cut in small pieces (one and a half sticks) — 11 oz. potato starch (about 2 cups) —1 tsp salt 12 oz. egg (about 5 eggs) —1 tsp mustard — Water to adjust — 2 cups cheese — 1 cup diced tomatoes —1/2 cup fresh spring greens, chopped or chiffon cut — 1 dried tbsp basil

    Instructions: 

    – Boil milk & butter together in a heavy-duty pot (temp. 320, takes about 10 minutes to come to a rolling boil).- While that is boiling, whisk together potato starch and salt in a large bowl

    –  Scale eggs and mustard into a large measuring cup, do not mix.

    – Scale cheese and mix-ins into another cup.

    – Pour potato starch and salt into the pot with milk and butter and stir to combine.

    – Add contents of pot to a bowl and mix on medium.

    – Add eggs one at a time with mixer running.  

    – Add cheese and mix-ins. Beat on medium-high for 60 seconds or until it’s a nice consistent light-colored paste, not separated.  Add 2-6 oz. additional water if necessary: you’re looking for a stiff peak when you pull the paddle out.

    – Scoop about 1/2 cup of mixture 1 inch apart on parchment-lined sheet.

    – Brush eggwash on top of rolls.

    – Bake at 325 for 45-60 minutes until they are light for their size and reach an internal temperature of 200 degrees.

    Did you make this recipe and have any suggestions? Make sure to leave a comment!

  • Vegan meringue cookie

    Vegan meringue cookie

    These tangy clouds have the most satisfying crunch but still, melt in the mouth. The perfect Valentine’s Day cookie without too much decadence!

    These meringues are the perfect office-friendly snack that everyone can enjoy. My coworkers loved them!

    Top tips from me:
    1) Look up what a stiff peak looks like before setting off on deciding whether your meringue is ready. Mine was definitely underdone, but they still came out delicious.
    2) I added a drop of raspberry extract and red food coloring to make these light pink beauties. Jaimie said you could try chopping up freeze-dried fruits and folding them in, such as strawberries. I couldn’t find any at my local grocery store so I went the extract route. Make sure they’re dried though because juice from the fruit will ruin the meringue while baking!
    3) This recipe yields a lot of meringue so make sure you have a lot of cookie sheets or the time and patience to do two rounds of cookies.
    4) Jaimie also makes these for cakes sometimes and adds them on as marshmallows. To do so, you would refrigerate them immediately after baking and they would get gooey. To keep them light and crunchy, store them at room temperature. They’ll stick together if you immediately put them all in the fridge.

    Time:
    This recipe yields a lot of cookies — probably about 3-4 dozen. Additionally, make sure you leave enough time. It will take about 30 minutes to make the meringue then another 2 hours to bake the cookies.

    Ingredients:
    12 oz. chickpea water — 2 tsp cream of tartar — 3 cups sugar

    Instructions:

    – In a small bowl, combine chickpea water and cream of tartar.  Mix on high for 2 minutes. 

    – Slowly add sugar, 1 tbsp at a time, until stiff peaks form (may not have to add all the sugar, start watching closely after 2 cups are in there.)

    – OPTIONAL: add food color and flavor (be careful, VERY sparingly, 1 drop) and hand-fold-in.

    – Scoop about 2 tbsp onto parchment lined paper. Top with sprinkles.

    – Bake at 220 degrees for 2 hours or until fully dried through and light for their size.

    Did you make this recipe and have any suggestions? Make sure to leave a comment!

  • Rosemary ginger mule

    Rosemary ginger mule

    The fresh rosemary and the sweet ginger syrup are the stars of this refreshing drink. My roommate and I both gulped down the drink, which tasted just like a ginger mule sans vodka. I’ll be making it again, especially in the summer and for any parties.

    I used to think the only non-alcoholic drink that was worth the money was mango juice. These are so refreshing though!

    Top tips from me:
    1) Laura recommends “spanking” the rosemary before adding it, and while that practice sounds like a practical joke, it actually does kick up the aroma, and subsequently, the flavor of the herb.
    2) Make sure you mix everything well, otherwise the ginger syrup will stay separated at the bottom of your glass.
    3) It may look classier in a copper mug, but alas, I do not own one.
    4) You can add any shrub or concentrate to enhance the flavor of the drink, but Element Shrub’s cranberry hibiscus, which Laura suggested, has enough of a bitter taste to cut through the sweet ginger syrup.
    5) For the rosemary-infused ginger syrup, I could only find ginger syrup at my local Giant, and I ran out of time to let it sit with some rosemary. Feel free to use just the syrup and then add the rosemary after.
    6) Laura also suggested Q Drinks brand ginger beer since she likes the spice, though I could only find Goslings. Use whatever brand you’d like!

    Time:
    This recipe takes a solid five minutes or so, depending on how meticulous you are with your drinks. 

    Ingredients:
    A stalk of fresh rosemary, spanked — one lime, for the juice and slices for garnish — rosemary-infused ginger simple syrup — ginger beer — ice — 1 oz Element Shrub, ginger lime or cranberry hibiscus

    Instructions:

    – Pour a squeeze of rosemary ginger syrup and squeeze the juice from half a lime into a 10-12 oz glass. Stir.

    – Add ice.

    – Add in 4-5 oz of ginger beer. Stir.

    – Top with 1 oz of Element Shrub.

    – Garnish with a sprig of rosemary and wedge of lime. Enjoy!

    Did you make this recipe and have any suggestions? Make sure to leave a comment!

  • Clam dip

    Clam dip

    This creamy, tangy dip is reminiscent of a tasty bowl of clam chowder with the added kick of hot sauce. It’s absolutely a hit at Laura’s family’s gatherings, and it will be at your next party, too.

    I’m not a seafood person, but my boyfriend ate up this dip and asked for more. It’s perfect for parties!

    Top tips from me:
    1) Chopped clams in juice are the way to go because then the chunks will be big enough and you can save the juice to fix the consistency of the dip. It should be neither too liquidy or too solid. 
    2) If your local Giant does not sell chives like mine, scallions are a common substitute, especially if you just thinly chop them.
    3) You need to chill this overnight or it will not be clammy enough — Laura’s orders.
    4) Serve with whatever dipping vehicle you prefer, but I chose pita chips, carrots and bell peppers. Laura recommended these plus raw broccoli and grape tomatoes. 
    5) While you will chill the dip, it’s important to leave your cream cheese out to soften so it’s easier to mix all the ingredients together.
    6) It’s optional but definitely add the hot sauce. Laura said you can use sriracha, Cholula, Tabasco, habanero — you name it!

    Time:
    Chopping the chives then assembling the ingredients only takes about 5 – 10 minutes, but the dip needs to be chilled overnight or for 4 – 5 hours.

    Ingredients:
    1 8 oz block of cream cheese — chopped chives, approx. 1/2 cup — Worcestershire sauce — kosher salt and black pepper to taste — paprika, for dip and garnish — 1 6.5 oz can of chopped clams, reserve the juice — optional: hot sauce — vegetables and pita chips for dipping

    Instructions: 

    – Mix it all together and chill for 4-5 hours before serving with crudites. Voila!

    Did you make this recipe and have any suggestions? Make sure to leave a comment!

  • Russian potato salad

    Russian potato salad

    This creamy goodness was a huge hit with my boyfriend. The soft potatoes and the salty dill pickles paired well, with an added surprise of fresh Granny Smith apple. The mayo tied it all together to melt in your mouth.

    You wouldn’t think green apples would work in potato salad, but they add a freshness to the mayo-coated dish.

    Top tips from me:
    1) I boiled my potatoes and carrots at the same time, with pickle juice to avoid overcooking, and they came out perfectly soft. 2) Boil the eggs ahead of time then run under cold water and stick in the fridge to cool. 3) Olga suggested I spread out the potatoes and carrots on a baking sheet and stick in the fridge so they cool evenly and quickly. 4) It’s easy to halve this recipe, which is what I did. Just eyeball when mixing components in to make sure it’s the perfect blend. 5) Olga has switched to using defrosted frozen peas, but I stuck with canned.

    Time:
    This recipe also takes about an hour from start to finish, and when halved, it yielded about 2-3 servings.

    Ingredients:
    3 carrots, peeled, boiled and cubed — 2 large potatoes, peeled and cubed (cook in water and a bit of pickle juice) — 2 hardboiled eggs, chopped — 1 cup canned peas, drained — 2 large pickles, chopped — enough mayo to coat everything — salt and pepper 

    Did you make this recipe and have any suggestions? Make sure to leave a comment!

  • Borsch

    Borsch

    Borsch
    This bright red, steaming bowl of soup was full of earthy tones, courtesy of the beets and cabbage. The rich sour cream cut through and added a salty note.

    Try a new thing and make a wish, as my family would say, with this savory soup — cooled down with sour cream.

    Top tips from me:
    1) Try to chop everything up before cooking. The timing of boiling the cabbage and potatoes while sauteing the beets and other veggies was a bit stressful. 2) Expect the beets to stain your fingers. The juice will wash off the cutting board, spatula and knife, however. 3) Use a cheese grater to shred the beets. 4) Try this even if you don’t think you’re a fan of beets!

    Time:
    This recipe takes about an hour, including prep, and serves 6-8. Feel free to cut it in half if you just want a bowl then some leftovers.

    Ingredients:
    Olive oil — 8 cups water — salt — 2 bay leaves — 1 large Russet potato, peeled and cut into large chunks — 2 cups thinly sliced cabbage — 1 tablespoon olive oil — 3 medium-sized beets, peeled (cube 2 1/2 beets and shred the remaining 1/2) — 2-3 carrots, peeled and cut into moon shapes — 1 small onion, chopped — 2 garlic cloves, chopped — salt and ground pepper — 2 tablespoons tomato paste — chopped dill — sour cream

    Did you make this recipe and have any suggestions? Make sure to leave a comment!